How to Completely Disable OneDrive in Windows 10 and Remove its Icon from File Explorer and System Tray
OneDrive comes pre-installed in Windows 10 but not all users wish to use it, as some prefer Google Drive or Dropbox.
For those who wish to disable OneDrive in Windows 10 and remove it from File Explorer, there are 2 easy methods, explained below. One involves using the Registry Editor (this is the preferred method for users of the Windows 10 Home edition) and the other method uses the Local Group Policy editor, available only in the Pro, Education, and Enterprise editions of Windows 10.
By following this tutorial, OneDrive won't be uninstalled but it will be completely disabled, won't load on start-up, and won't interfere with your PC work. The OneDrive icon will be removed from File Explorer and System Tray as well. You can choose to re-enable OneDrive later on, if you wish.
What happens with OneDrive disabled:
- You won't be able to access the OneDrive app
- Local OneDrive files won't be synced with the OneDrive cloud versions
- OneDrive won't show up in the navigation pane in File Explorer
- Other Windows Store apps won't be able to access OneDrive using the WinRT API
- You won't be able to automatically upload photos or videos from the camera roll folder
Jump to:
- Method 1 using the Registry Editor (Win 10 Home)
- Method 2 using the Group Policy Editor (Win 10 Pro, Enterprise, and Education)
Completely Disable OneDrive in Windows 10 and remove its icon from tray and File Explorer, using the Registry Editor (the only method for Windows 10 Home users)
This method works for all Windows 10 editions, but method 2 below is easier for users of Windows 10 Pro, Enterprise, and Education.
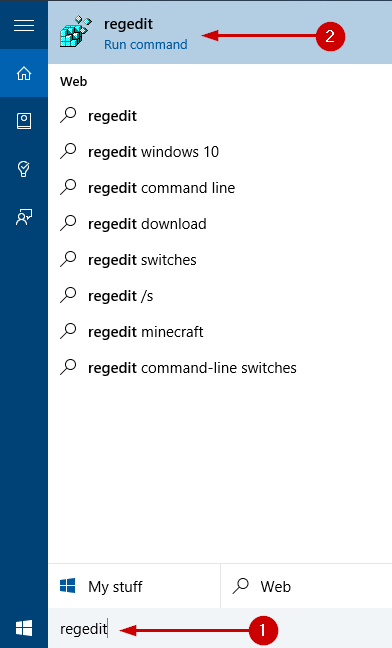
1. Open the Windows Registry Editor. You can do this by simply pressing Start and typing regedit in the search box, then select the first result, as shown below.
Click Yes on the next screen, the User Account Control prompt, if you get one.
2. Navigate to the following registry key:
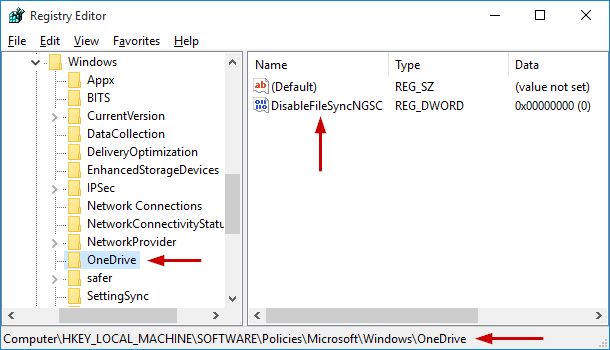
HKEY_LOCAL_MACHINE\Software\Policies\Microsoft\Windows\OneDrive
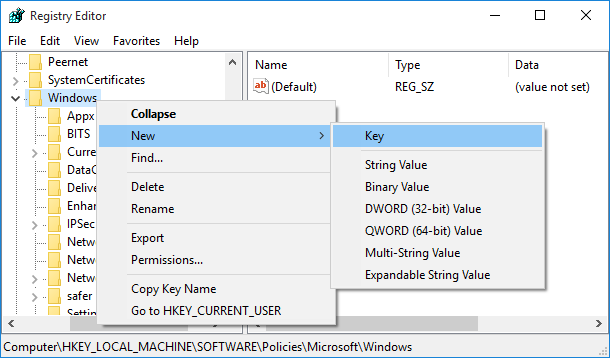
If you don't have the OneDrive key, you can simply create it by navigating to HKEY_LOCAL_MACHINE\SOFTWARE\Policies\Microsoft\Windows\ , right-click on Windows > New > Key and name it OneDrive, as shown below.
3. In the right pane, look for DisableFileSyncNGSC. If you don't have it simply right-click the empty space in the right pane and choose New > DWORD (32-bit) Value. Name it DisableFileSyncNGSC. In the end you should end up with this file, as shown below.
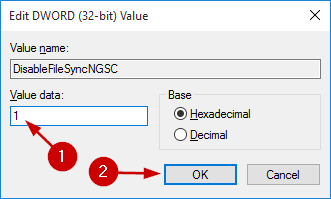
4. Double click DisableFileSyncNGSC and change its value to 1. (Or you can Right-click > Modify > 1)
5. Right-click OneDrive's tray icon and choose Exit.
The OneDrive tray icon is now gone and OneDrive's File Explorer integration no longer present. If not, you can sign out and sign in, or do a system restart.
(Re)Enable OneDrive via Registry Editor
Steps 1 to 3 from above followed by:
4. Double click DisableFileSyncNGSC and change its value to 0. (Or you can Right-click > Modify > 0). Alternatively you can just delete DisableFileSyncNGSC entirely.
5. Open the OneDrive app by pressing Start and entering OneDrive, then hit Enter. This will initiate the app and re-integrate it in File Explorer and system tray. You'll need to log in with OneDrive using your Microsoft account.
Completely Disable OneDrive in Windows 10 and remove its icon from tray and File Explorer, using the Group Policy Editor (Win 10 Pro, Enterprise, and Education)
1. Open the Local Group Policy Editor by pressing Start, type gpedit.msc and hit Enter.
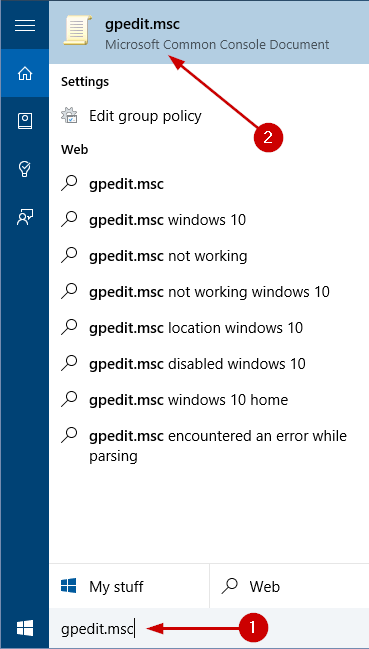
Alternatively you can open the RUN dialog by pressing Win+R, type gpedit.msc, then Enter.
2. In the left pane navigate to Computer Configuration > Administrative Templates >Windows Components > OneDrive.
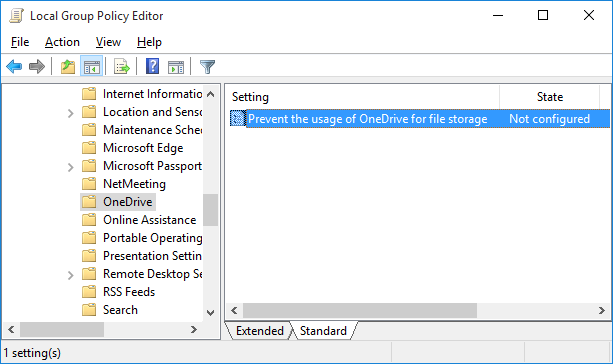
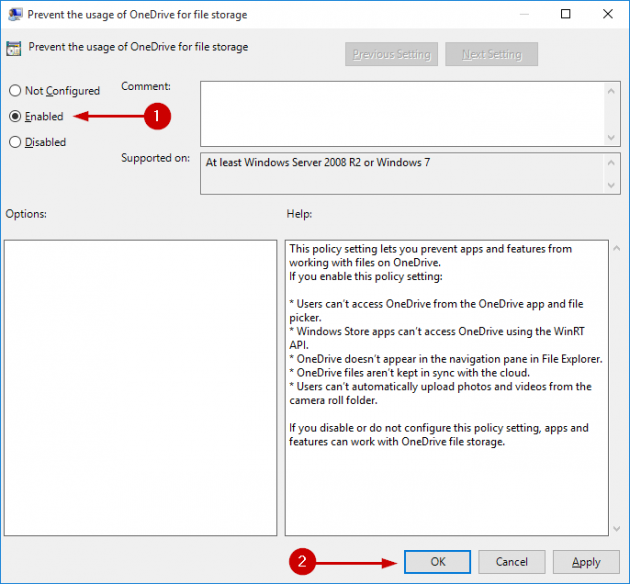
3. In the right pane of OneDrive double click Prevent the usage of OneDrive for file storage. A new window pops up with configuration options.
4. Select Enabled and click Apply/Ok as shown below.
5. Right-click OneDrive's tray icon and choose Exit.
The OneDrive tray icon is now gone and OneDrive's File Explorer integration no longer present. If not, you can sign out and sign in, or do a system restart.
(Re)Enable OneDrive via Group Policy Editor
Steps 1 to 3 from above followed by:
4. Select Disabled or Not Configured and click Apply/Ok.
5. Open the OneDrive app by pressing Start and entering OneDrive, then hit Enter. This will initiate the app and re-integrate it in File Explorer and system tray. You'll need to log in with OneDrive using your Microsoft account.
Tip: The process is similar for Win 8.1: How to disable OneDrive in Windows 8.1, removing the OneDrive tray icon in the process (2 methods)

