
How to Take Ownership and Gain Full Access to Files/Folders in Windows 10 (and Vista, 7, 8)
Anyone who fiddles around with system settings and apps will, at some point, come across the need to take ownership and get full access to a file or folder. By taking ownership of a file or folder, in essence, you make it yours even if it belongs to another user, and by gaining full access, you bassically acquire permissions to do anything you want to it (access, modify, move, etc.).
So let’s see how you can take ownership and gain full access to a file or folder in Windows 10. First we cover the typical ways for taking ownership and getting full access manually from the item’s properties, and then we make use of a 3rd-party tool called TakeOwnershipEx that does both. You can use whichever method you find more suitable.
Click on the links below to jump to the corresponding topic in the article:
- Taking Ownership of a File/Folder Manually (Windows 8, 8.1, 10)
- Gaining Full Access to a File/Folder Manually (Windows 8, 8.1, 10)
- Taking Ownership and Gaining Full Access to a File/Folder Using TakeOwnershipEx (Windows Vista, 7, 8, 8.1, 10)
Taking Ownership of a File/Folder Manually
Step 1: Go to Properties of the File/Folder
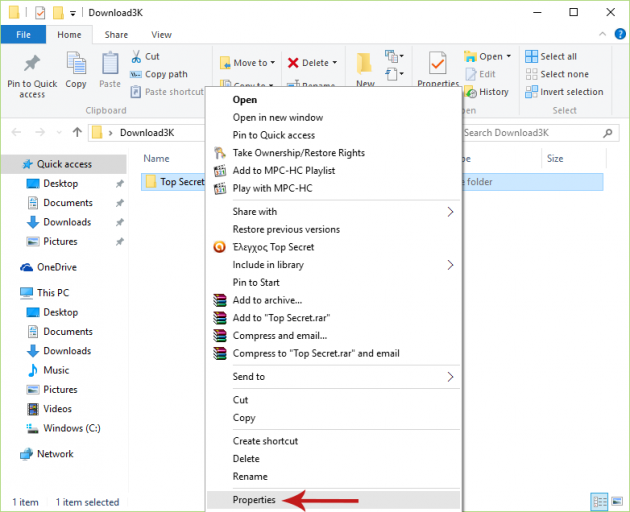
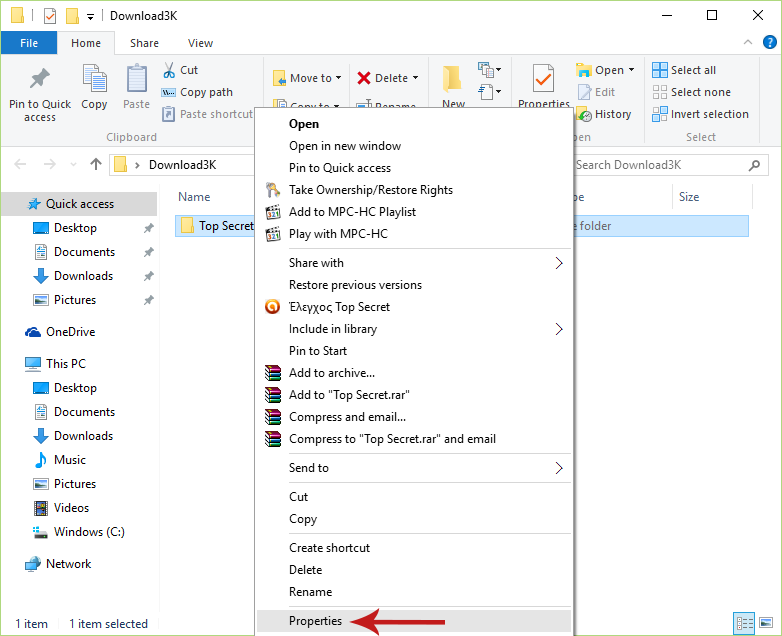
Open File Explorer and locate the file or folder you want to take ownership of. Then right-click on it and select Properties.
Step 2: Go to the Security Tab and Click ‘Advanced’
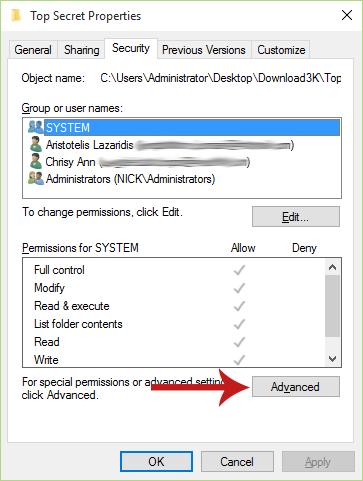
In the Properties window, navigate to the Security tab and click the Advanced button.
Step 3: Open Window to Select New Owner
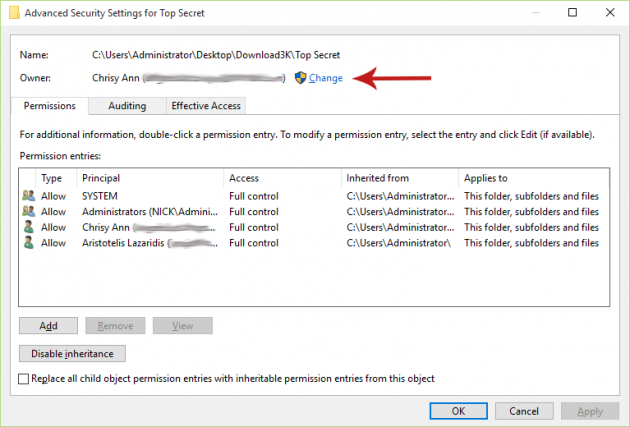
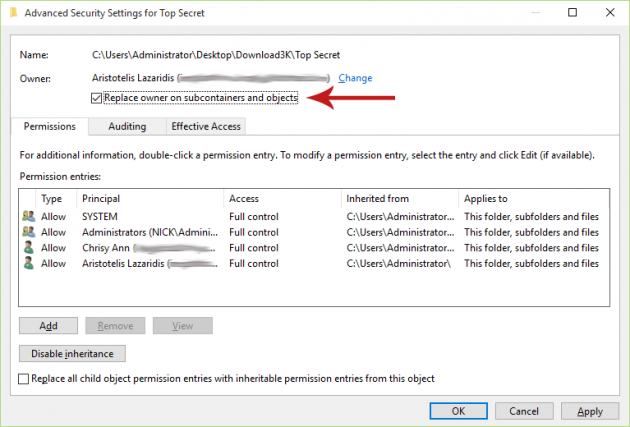
In the Advanced Security Settings window, click on the Change link located next to the label of the current owner.
Step 4: Select New Owner
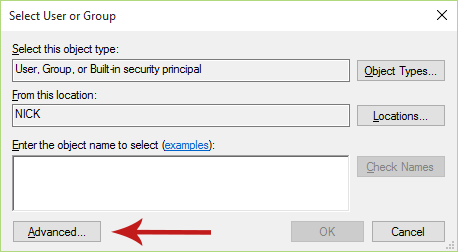
The new window has a textbox at the bottom, in which you enter the name of the account you want to give ownership to (yours, in this case). You can type the name yourself, but if you don’t know the exact name of the account, there’s an easy way to find it: click the Advanced button, and in the new window that opens select Find Now to display a list of all available accounts. Then select the account of your choice from the list and click OK to enter it to the textbox.
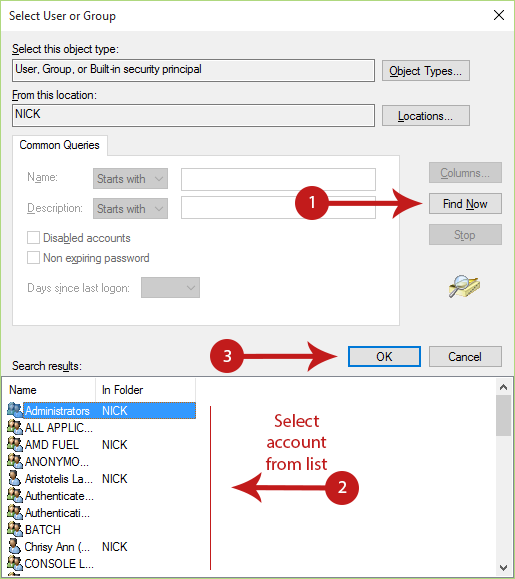
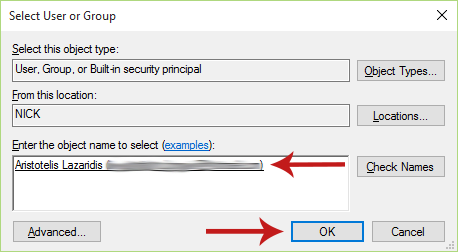
When the new account is entered in the textbox, you can click Check Names to see if the name you entered is valid or not (an error message will appear if it’s not valid). Finally, hit OK in all open windows to change owner and save changes.
Optional: If you took ownership of a folder and also want to take ownership of the files and subfolders included in that folder as well, then in the Advanced Security Settings window check the Replace owner on subcontainers and objects option.
Gaining Full Access to a File/Folder Manually
Step 1: Go to Properties of the File/Folder
Open File Explorer and locate the file or folder you want to take ownership of. Then right-click on it and select Properties.
Step 2: Go to the Security Tab and Click ‘Advanced’
In the Properties window, navigate to the Security tab and click the Advanced button.
Step 3: Open ‘Permission Entry’ Window
In the Advanced Security Settings window, click the Add button located at the bottom.

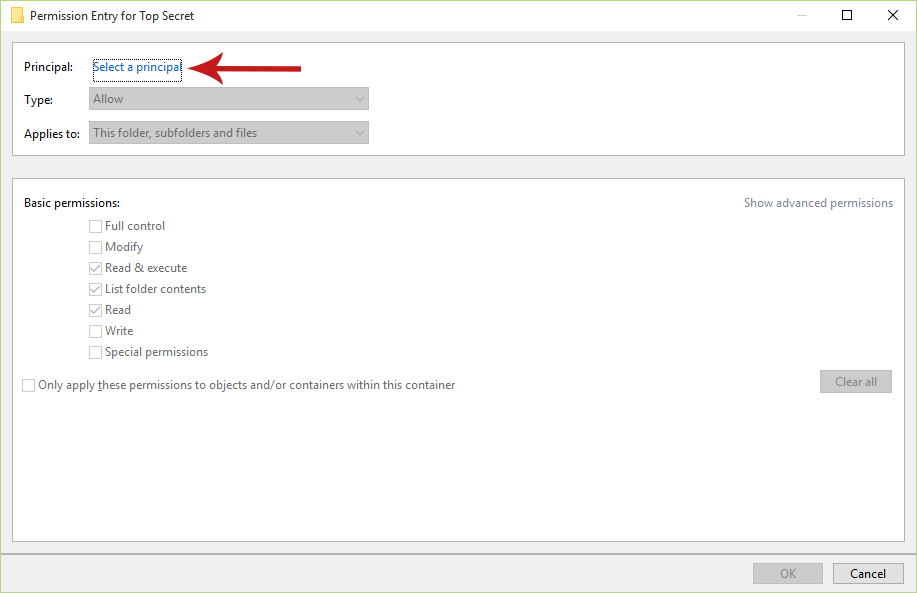
Step 3: Open Window to Select Principal
In the Permission Entry window click on the Select a principal link located at the top to open a new window.
Step 4: Select New Principal
Enter the name of the account you want to get full access (yours, in this case) in the textbox. Type the name of the account if you want, but it's easier by doing the following: click the Advanced button, and in the new window that opens click Find to display a list of all available accounts. Then select the account of your choice from the list and click OK to enter it to the textbox.
When the new account is entered in the textbox, you can click Check Names to see if the name you entered is valid or not (an error message will appear if it’s not valid). Then click OK to add the account as a principal.
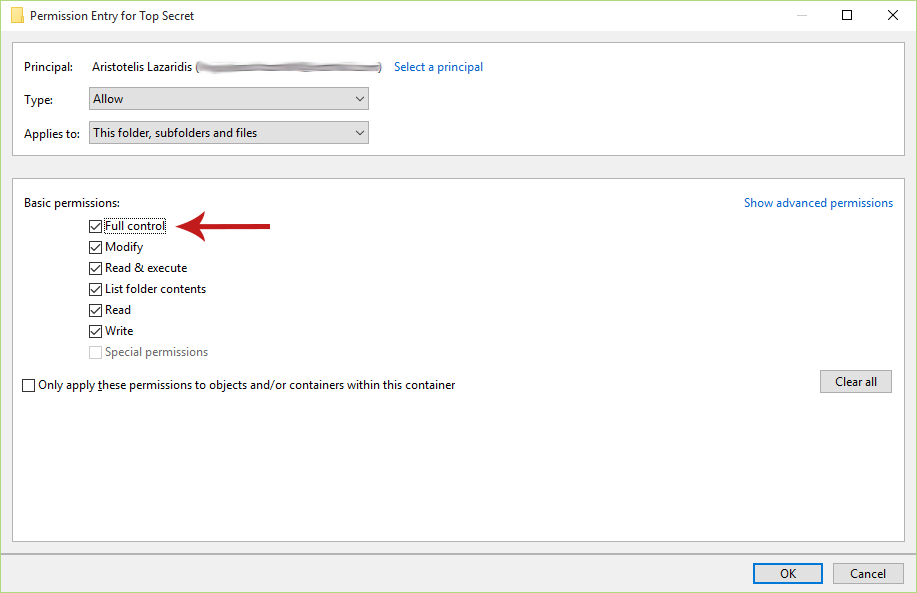
Step 5: Set Permissions to Full Control
In the Permission Entry window check the Full control box and click OK in all open windows to save changes. That's it, you now have full access to the file/folder.
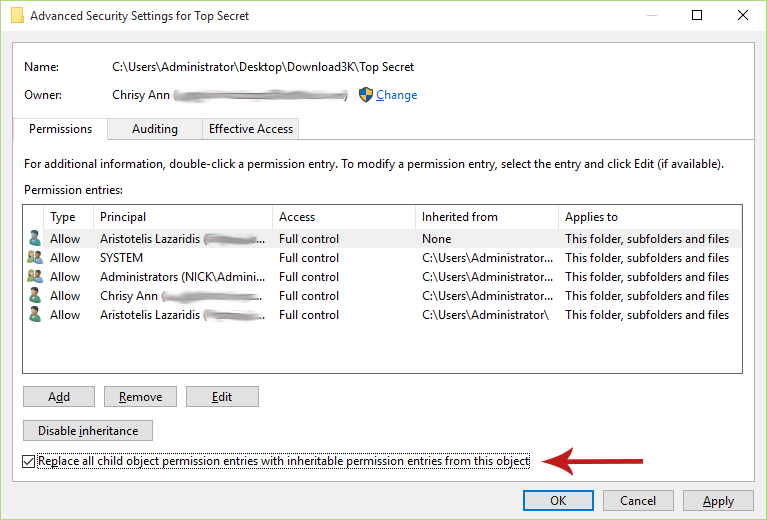
Optional: If you took ownership of a folder and also want to take ownership of the files and subfolders included in that folder as well, then in the Security Settings window check the "Replace all existing inheritable permissions on all descendants with inheritable permissions from this object" option.
Taking Ownership and Gaining Full Access to a File/Folder Using TakeOwnershipEx
This handy tool can give you ownership and full access to a file or folder of your selection, with the click of a button. Furthermore, it can revert ownership and permissions to those items, again with just a single click.
Step 1: Download and Install TakeOwnershipEx
First, download from here the archive that includes TakeOwnershipEx. Extract it afterwards, and then run the included setup package.
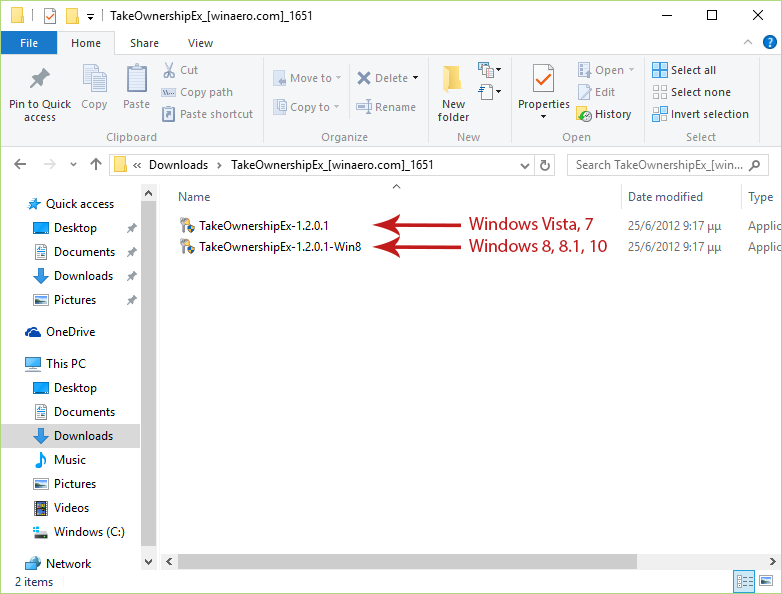
Note that there are two executables in the archive:
- TakeOwnershipEx-1.2.0.1.exe - for Windows Vista, 7
- TakeOwnershipEx-1.2.0.1-Win8.exe - for Windows 8, 8.1, 10
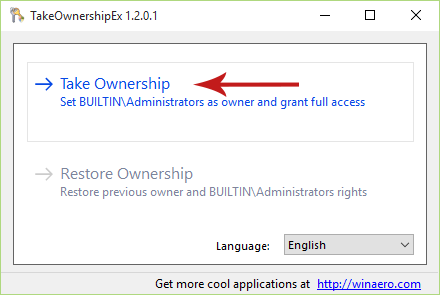
Step 2: Run TakeOwnershipEx
After the installation of the program is completed, run it. You will see two buttons on its window: Take Ownership and Restore Ownership. Select Take Ownership.
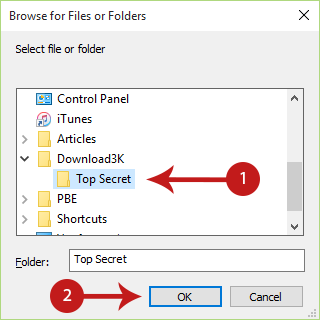
Step 3: Select File/Folder
From the dialog that opens, select the file or folder that you want to take ownership of and gain full access to, then click OK.
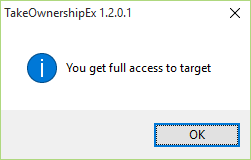
Done! A message will pop up stating that you now full access to the item you selected.
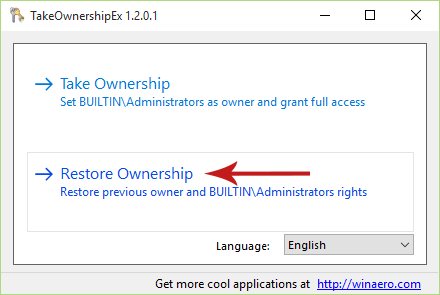
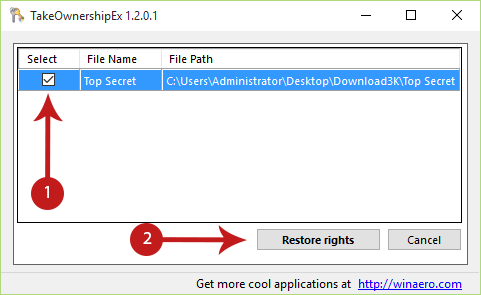
Step 3: Restore Ownership and Permissions
You can revert back to the original owner and permissions just as easy:
First, click the Restore Ownership button in TakeOwnershipEx’s window to display all items that you've got full access to using it.
From that linst, mark the desired item and hit Restore rights.
A message will appear, informing you that ownership and rights are restored to the original account.
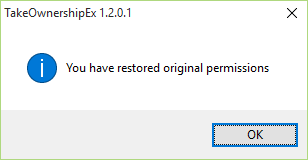
Done!
If you have any problems, or want to ask a question, then do so in the comments section below!