
How to Completely Remove All or Specific Built-in Apps in Windows 10
Windows 8 introduced the Store and modern apps to all users, which wouldn’t be so bad if Microsoft had considered more the user experience in laptops and desktop computers, instead of focusing so much on the Windows 8 mobile experience. When Windows 8 came out, the public opinion was pretty much “It's awesome for Windows phones, but not so good for computers”.
With the release of Windows 10, it was obvious that this issue was taken into consideration. The new OS is far superior to Windows 8/8.1, mainly due to the fact that the computer version just feels better, and it's not like you're using a big Windows phone with a keyboard and mouse. Modern apps are still included in Windows 10, and even though they are organized better, some users still prefer to get rid of them so as to enjoy Windows 10 in their computers more comofrtably.
In this article we’ll give you instructions for completely removing all or individual bundled apps from the system, your own account, another user account, or all user accounts in Windows 10. It’s true that some of the modern apps can be uninstalled normally by right-clicking on them and selecting Uninstall, but this does not remove them from the system completely however; it just puts them into a Staged status, in which they are ready to be installed again when a new user account is created (or perhaps when an update brings them back). So if you create another user account, it will still have all those bundled apps installed. So here is how to get rid of all those default modern apps in your machine for good!
Note: Reinstalling the apps once you remove them with the methods described below can be troubling sometimes, therefore you should have a backup available, or be 100% aware of the consequences.
For easier navigation you can click to one of the topics below and jump directly to it:
- Removing All Apps Except for Windows Store from your Current Account
- Removing All Apps Except for Windows Store from a Specific User Account
- Removing All Apps Except for Windows Store from All Existing User Accounts
- Removing All Apps Except for Windows Store from New User Accounts
- Removing Specific Apps from your Current Account
- Removing Specific Apps from All Existing User Accounts
- Removing Specific Apps from New User Accounts
Opening an Elevated PowerShell Window
All of the following procedures for removing built-in apps require you to open an Elevated PowerShell Window, so we'll just describe only once how to do that:
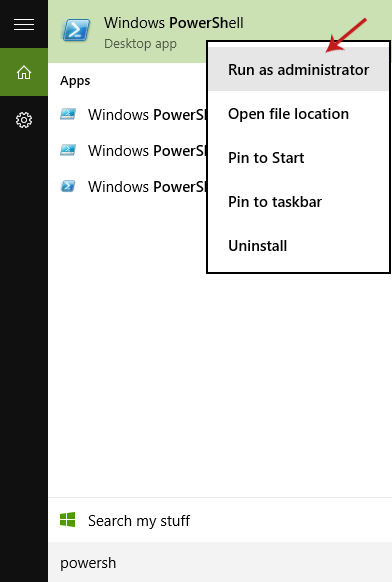
Open the Start menu and type “PowerShell” (without quotes). When the Windows PowerShell app is displayed in the results right-click on it and select “Run as administrator”, then press Enter to bring up PowerShell. Piece of cake!
Removing All Apps Except for Windows Store from your Current Account
This will remove all apps except for Store from your current account only. All other accounts will remain intact.
1. Open an Elevated PowerShell Window.
2. Type/paste the following command and press Enter:
Get-AppXPackage | where-object {$_.name –notlike “*store*”} | Remove-AppxPackage
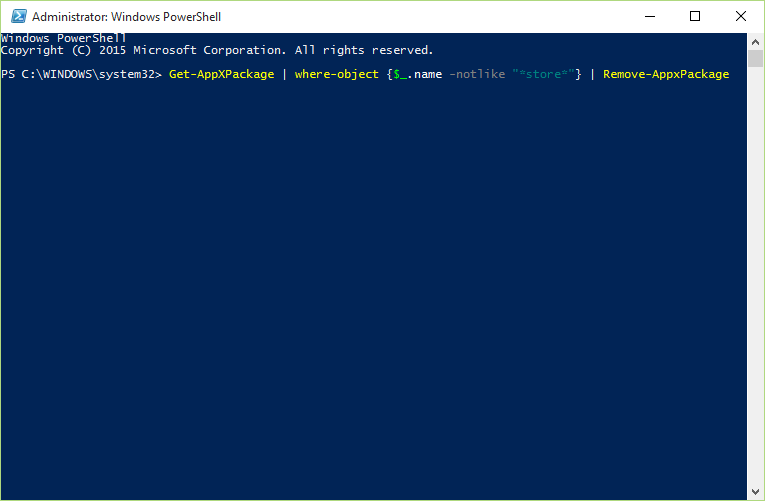
Done! All apps except for Store are now removed from your current account.
Removing All Apps Except for Windows Store from a Specific User Account
This will remove all apps except for Store from a specific user account only. This won’t have an effect on other user accounts.
1. Open an Elevated PowerShell Window.
2. Type/paste the following command and press Enter, but replace TYPEUSERNAMEHERE with the username of the account you want to remove the apps from:
Get-AppXPackage -User TYPEUSERNAMEHERE | where-object {$_.name –notlike “*store*”} | Remove-AppxPackage
For example, if you want to remove all apps from the user Download3K, then the command would be:
Get-AppXPackage -User Download3K | where-object {$_.name –notlike “*store*”} | Remove-AppxPackage
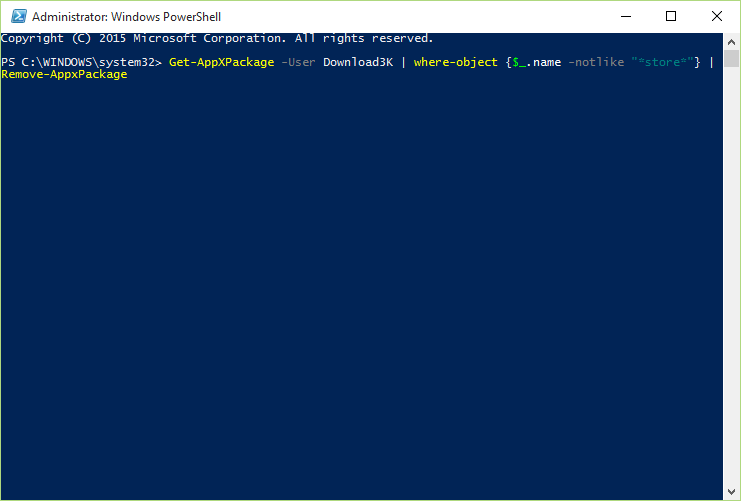
That’s it! All apps from that specific account (except for Store) will be removed.
Removing All Apps Except for Windows Store from All Existing User Accounts
This will remove all apps except for Store from all existing user accounts. New user accounts won’t be affected by this.
1. Open an Elevated PowerShell Window.
2. Type/paste the following command and press Enter:
Get-AppxPackage -AllUsers | where-object {$_.name –notlike “*store*”} | Remove-AppxPackage
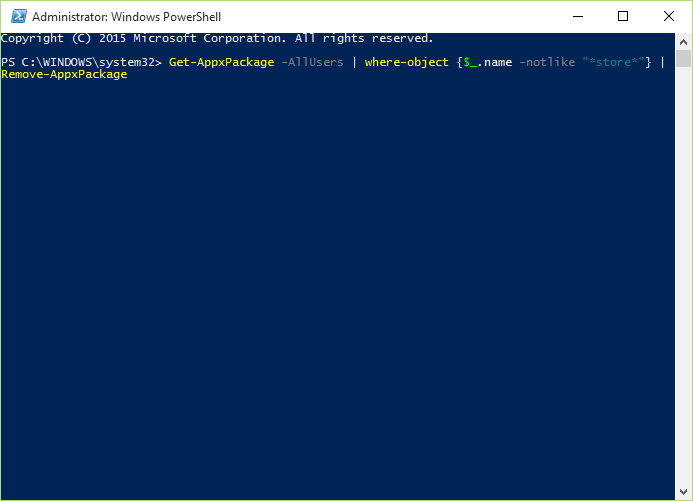
Done! All apps except for Store are now removed from all accounts.
Removing All Apps Except for Windows Store from New User Accounts
In this method we’ll remove all apps except for Store so that new accounts created afterwards will not have those apps. This will speed up the process of creating new user accounts.
Note: The apps will not be removed from your current or other existing user accounts.
1. Open an Elevated PowerShell Window.
2. Type/paste the following command and press Enter:
Get-AppXProvisionedPackage –online | where-object {$_.packagename –notlike “*store*”} | Remove-AppxProvisionedPackage –online

Done! From now on, new user accounts will have no modern apps installed apart from Store!
Removing Specific Apps from your Current Account
In this method we’ll explain how to remove individual apps from your current account.
1. Open an Elevated PowerShell Window.
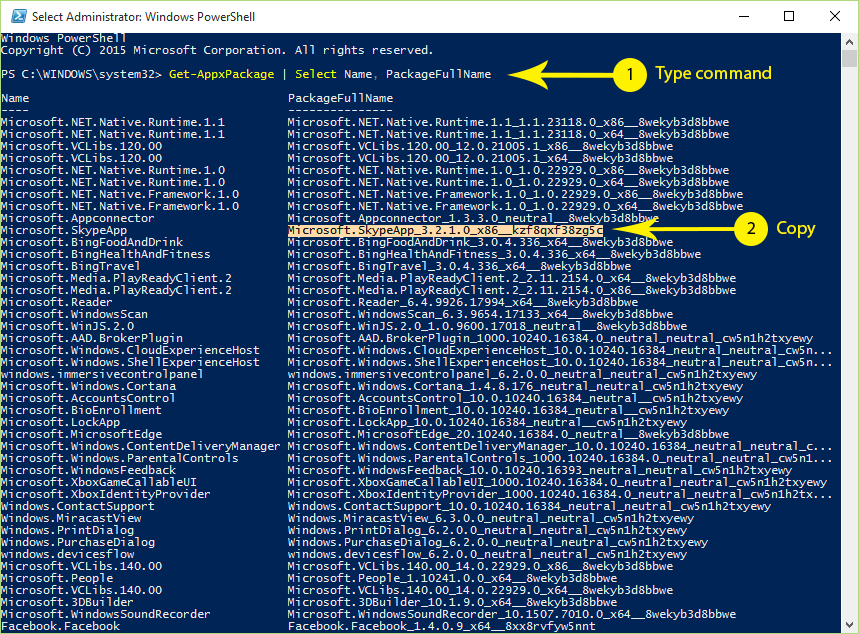
2. Type/paste the following command and press Enter in order to view all currently installed apps:
Get-AppxPackage | Select Name, PackageFullName
Two columns will be displayed in the PowerShell window after running the command. Locate the app that you want to remove in the Name column (left), and copy its corresponding full name from the PackageFullName column (right).
For example, if we wanted to remove the Skype app, we locate it in the Name column first (Microsoft.SkypeApp) and then we copy its full name from the PackageFullName column (Microsoft.SkypeApp_3.2.1.0_x86__kzf8qxf38zg5c – it might be slightly different in your computer).
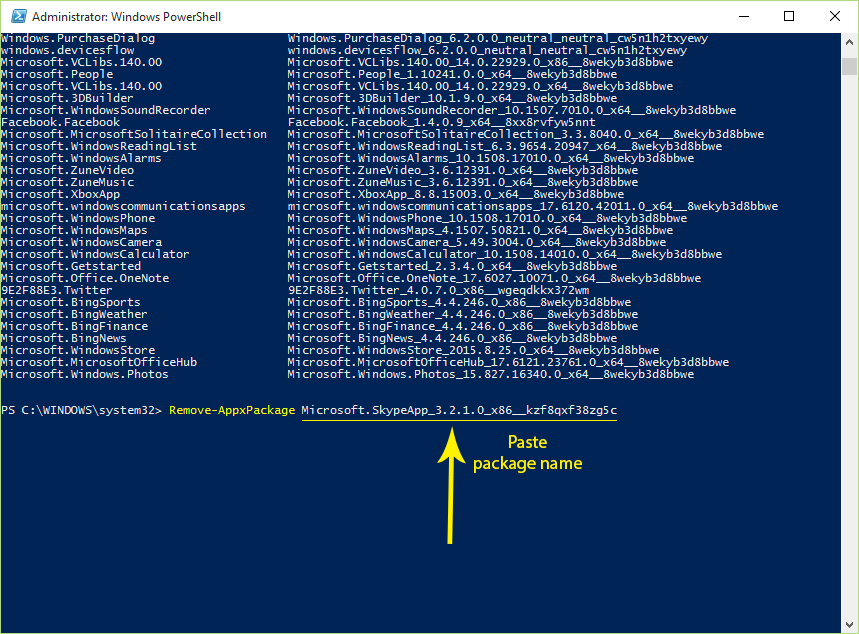
3. Type/paste the following command and press Enter, but replace FULLNAME with the full name that you just copied:
Remove-AppxPackage FULLNAME
For instance, if you wanted to remove the Skype app (after having copied its full name in Step 3) the command would be:
Remove-AppxPackage Microsoft.SkypeApp_3.2.1.0_x86__kzf8qxf38zg5c
Done! This app is now removed from the current account.
Removing Specific Apps from All Existing User Accounts
This method will help you remove built-in apps completely from all existing user accounts, including your current account. Future accounts will not be affected by this.
1. Open an Elevated PowerShell Window.
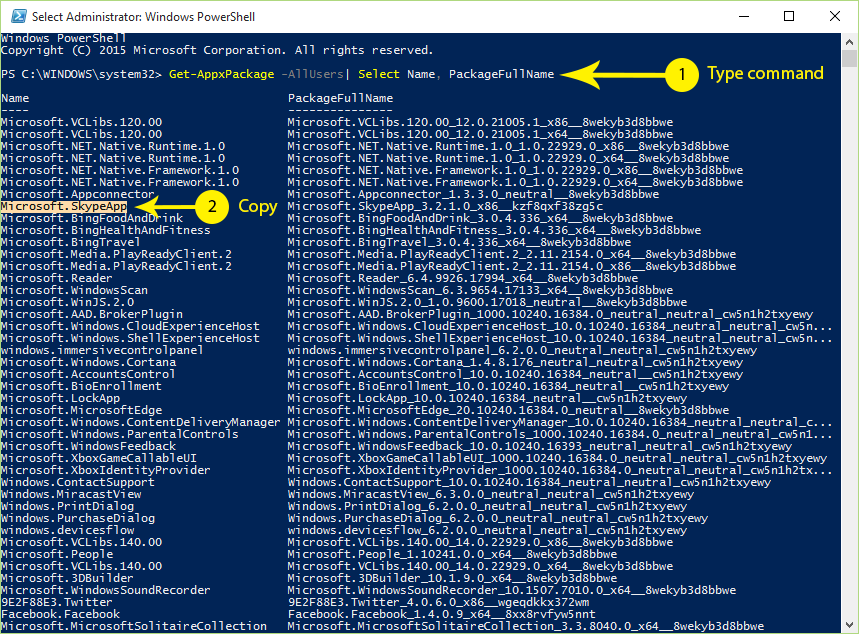
2. Type/paste the following command and press Enter in order to view all currently installed apps:
Get-AppxPackage -AllUsers| Select Name, PackageFullName
From the two colunms that appear in the PowerShell Window, locate the app you want to remove in the Name column (left) and copy its name. For example, if you wanted to remove the Skype app, then find its package name in the left column and copy it (Microsoft.SkypeApp).
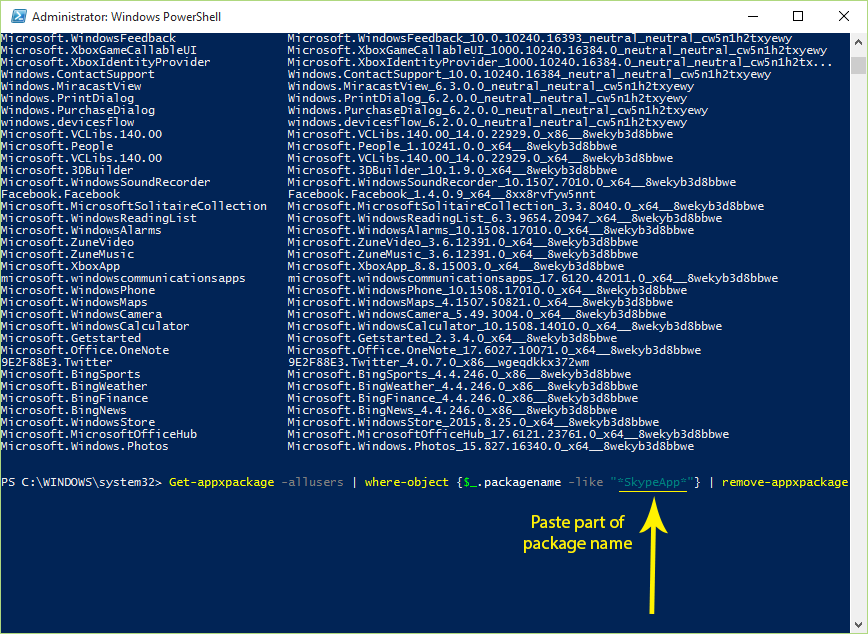
3. Type/paste the following command and press Enter, but make sure that you replace APPNAME with the app’s package name that you just copied, or at least a significant part of it:
Get-appxpackage -allusers | where-object {$_.packagename -like "*APPNAME*"} | remove-appxpackage
For example, after having copied the package name of the app we want to remove (Microsoft.SkypeApp), the command would be:
Get-appxpackage -allusers | where-object {$_.packagename -like "*Microsoft.SkypeApp*"} | remove-appxpackage
Or, if we decide to keep only a part of the package name:
Get-appxpackage -allusers | where-object {$_.packagename -like "*SkypeApp*"} | remove-appxpackage
And voila! This app is now removed from all existing user accounts. Follow the same process again to remove more apps.
Removing Specific Apps from New User Accounts
With this method you can remove individual apps so that new accounts created in the future will not have them installed. Doing that will also have a positive effect on the time it takes to create a new user account.
1. Open an Elevated PowerShell Window.
2. Type/paste the following command and press Enter in order to view all currently installed apps:
Get-AppxPackage -AllUsers| Select Name, PackageFullName
From the two columns displayed in the PowerShell Window, locate the app you want to remove in the Name column (left) and copy its package name. For example, if you wanted to remove the Skype app, then find its package name in the left column and copy it (Microsoft.SkypeApp).
4. Type/paste the following command and press Enter, but make sure that you replace APPNAME with the app’s package name that you just copied, or at least a significant part of it:
Get-appxprovisionedpackage –online | where-object {$_.packagename –like "*APPNAME*"} | remove-appxprovisionedpackage –online
So, to remove the Skype app, after having copied the package name the command would be:
Get-appxprovisionedpackage –online | where-object {$_.packagename –like "*Microsoft.SkypeApp*"} | remove-appxprovisionedpackage –online
Or, simpler:
Get-appxprovisionedpackage –online | where-object {$_.packagename –like "*SkypeApp*"} | remove-appxprovisionedpackage –online

Ok, that’s it! From now on, any account you create will be free of this app. Repeat the same process to remove more apps.
If you're having trouble with any of the above commands, or want to share a tip/suggestion, then post in the comments section below!