
How to screen capture a fixed region instead of a regular print screen on Windows
At some point in your tech life you might find the need to screen capture a fixed region from within your Windows OS. Of course an easy way to bypass this need is to capture a wider part of your desktop and crop it using an image editor, but for speed and convenience you might want a dedicated tool for this job.
(If you're still interested in cropping a wider part from your screen with an image editor, check out our recommended Top 8 free online image editors)
While the default Print included in Windows, or the Snipping Tool added from Vista onwards, don't offer this capability, there are several screen capture software that can do this for you. Here are 4 of them and how to define and capture a fixed region with each one:
1. Screenshot Captor (free, review, mirrors)
It has a regular setup as well as a portable installation. Does not have a modern GUI but it compensates with a huge amount of features. Plus it's free.
Define the size of the fixed region
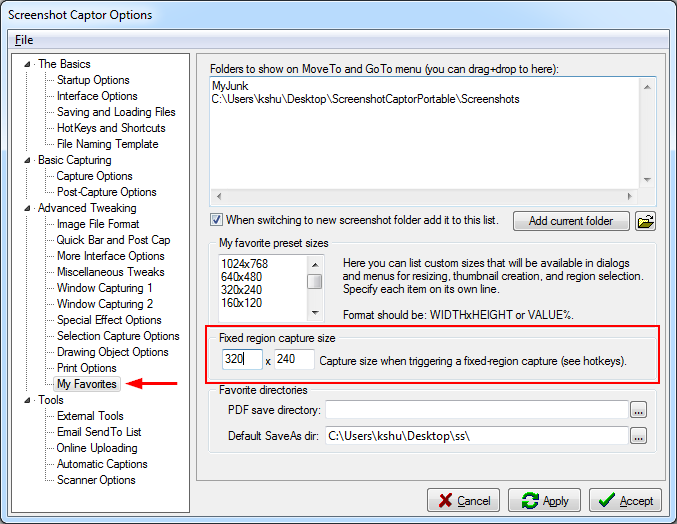
Enter Settings by clicking the Gears icon in the floating Quick Capture Bar or by right-clicking the Screenshot Captor tray icon, and choosing Preferences. In the left pane go to Advanced Tweaking > My Favorites. You can define the Fixed region capture size there, as shown below. Not the most obvious path if you're looking for this setting.
Capture a fixed region
In the floating Quick Capture Bar, click the 'F' button. Or right-click the tray icon and choose Grab Fixed size region. By default you can use the hotkey Ctrl+Alt+PrtScn. To modify this hotkey go to Settings > The Basics > HotKeys and Shortcuts.
2. PicPick (free, review, mirrors)
Free for personal use, it comes with powerful capture options as well as editing and sharing options, but we'll not dive into those features here. The GUI is simple and attractive.
Define and capture a fixed region
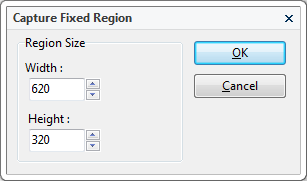
You can't actually define the size you want to capture by entering the program's setting - it's nowhere to be found inside the Program Options. Instead you must first try to capture a fixed region by right-clicking the tray icon and choosing Screen Capture > Fixed Region, then cancel the action by hitting Esc or right-clicking anywhere. This will cancel the capturing mode and pop-up a window for setting up the size of the region you need to capture. After you enter the desired values, click OK and the capture process will resume, with a floating rectangular marking the region you defined.
Alternatively, you can capture a fixed region by hitting the Hotkey Ctrl+Alt+PrtScn, a hotkey which can be modified under Program Options > Hot keys.
3. FastStone Capture (paid, review, mirrors)
It comes with a nifty yet simple GUI, a regular installation as well as a portable one, powerful features, and a 30-days trial.
Define the size of the fixed region
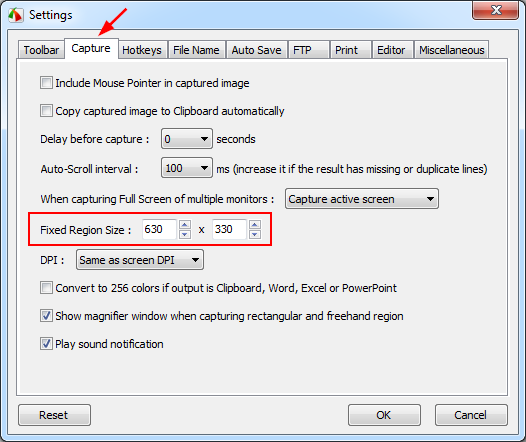
Enter Settings by either clicking the Settings button on the floating toolbar, or by right-clicking the tray icon and choosing Settings. Go to the Capture tab and define the size of the fixed region you need to capture, as shown below.
Capture a fixed region
Ctrl+Shift+Alt+PrtScn is the default hotkey to capture a fixed region, or you can hit the Capture Fixed Region button on the floating toolbar, or right-click the tray icon and choose .. you guessed it: Capture Fixed Region. You can modify the hotkey by going to Settings > Hotkeys.
A nifty feature is the ability to change the size of the fixed region while you hover the floating region rectangle over the screen. You can either hit F2 then and modify the capture size or use Shift+arrows to redefine the size, pixel by pixel.
4. Ashampoo Snap (paid, review, mirrors)
This has the most stylish interface of all four, but it comes with a price: $14 USD.
Define the size of the fixed region
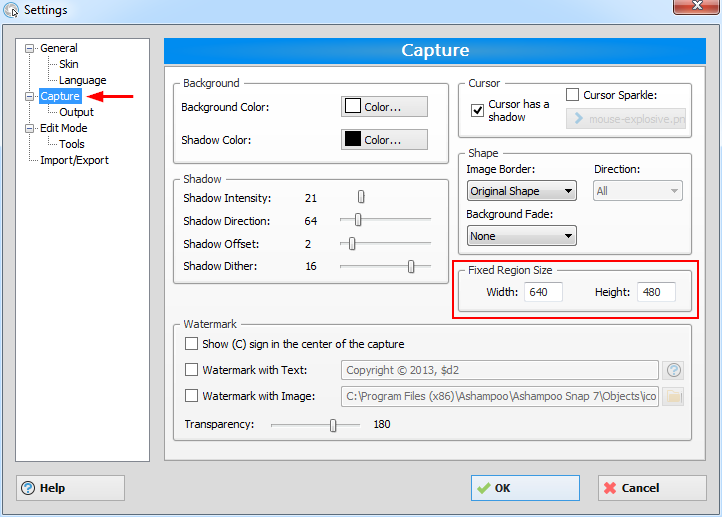
You can define the fixed region by going to Settings. Left or right-click the Ashampoo Snap tray icon, choose Configure, Configuration, Capture and enter the needed size under Fixed Region Size.
Capture a fixed region
Point your mouse towards the top of the screen to expand the Capture Bar where you have buttons for every capture task it does, including the Capture Fixed Region one.
![]()
Alternatively, you can left or right-click the Ashampoo Snap tray icon > Capture Region > Capture Fixed Region. By default, there is no keyboard shortcut assigned for this task, but you can define one by going to Settings. Left or right-click the Ashampoo Snap tray icon, choose Configure, Configuration, Generaland enter a hotkey under Hotkeys.