
How to Configure Windows Updates in Windows 10
Windows 10 has many new features that were not included in previous versions of Windows, but has also removed other features that used to exist. One example is the ability to configure how Windows Updates are downloaded and installed as you used to, since now the only thing you are able to do without tweaking some hidden setting is schedule reboots manually in order for the updates to finish installing. This means that you can’t disable automatic download and installation of updates, unless you perform some tricks and tweaks, which you will learn in this article.
You can click on the links below to jump to a particular topic:
- Scheduling Restarts for Updates in Windows 10
- Preventing Automatic Download of Updates in Windows 10
- Configure Windows Updates in Windows 10 by Using Group Policy (Pro and Enterprise Editions only)
- Configure Windows Updates in Windows 10 by Tweaking the Registry (Pro and Enterprise Editions only)
- Alternative option: O&O Syspectr
Scheduling Restarts for Updates Manually in Windows 10
Windows 10 will automatically reboot your device at some point in order to complete the installation of the downloaded updates, which can be quite frustrating if that happens when you’re using it. So here is how to make the system ask you for a manually scheduled reboot every time it wants to finish installing updates:
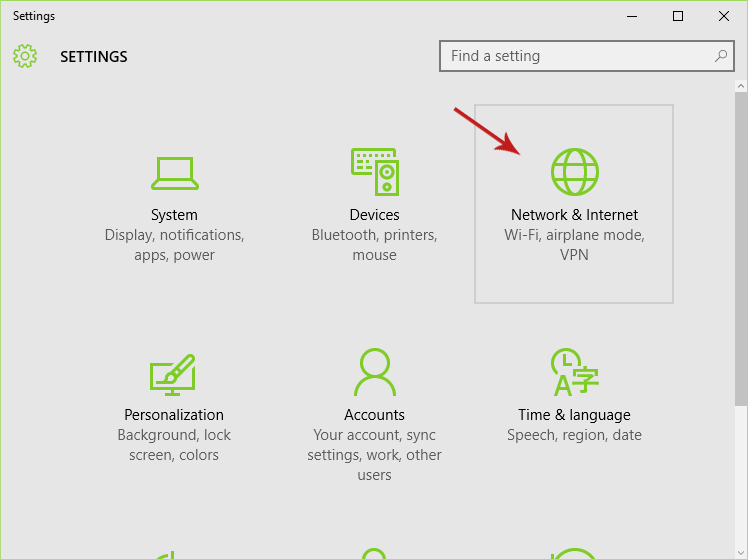
Step 1: Go to Settings
First step here is to open the Start menu and select Settings.
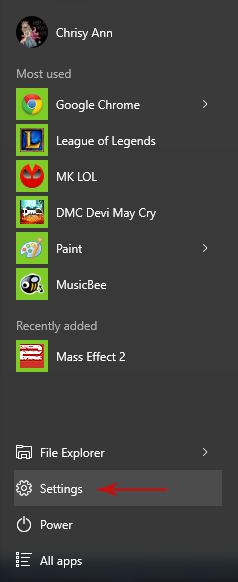
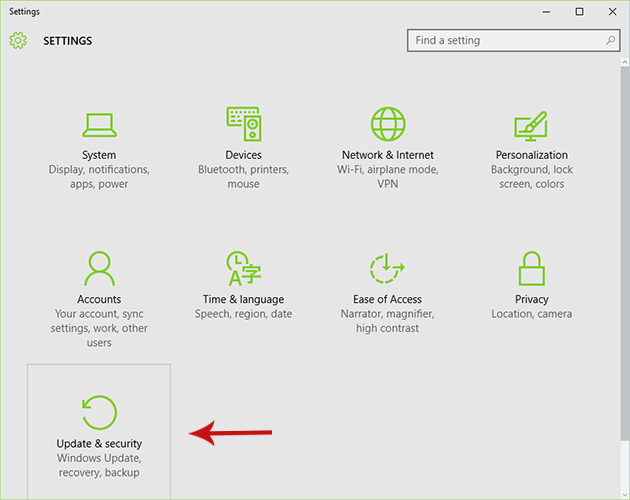
Step 2: Select “Update & security”
From the Settings window, select the Update & security option.
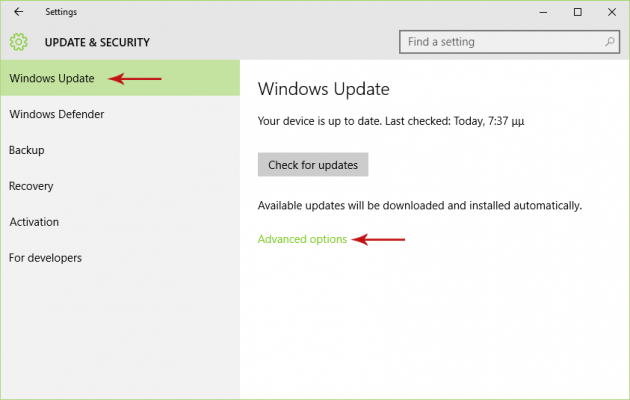
Step 3: Open the Advanced Options in Windows Update
In the Update & security settings, select Windows Update from the sidebar on the left and then select Advanced options.
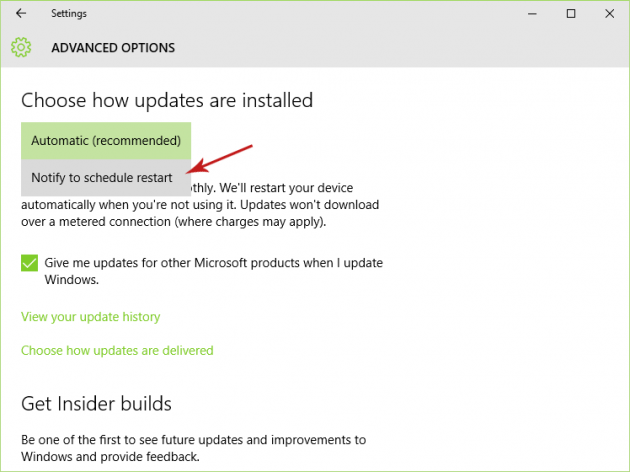
Step 4: Choose How Updates are Installed
Do you see the dropdown list at the top of the window? By default, it is set to Automatic (recommended). That's what you need to change, so select it and choose Notify to schedule restart.
Step 5: Schedule Reboot Manually
Now, whenever a reboot is required in order to finish the installation of updates, you will be notified and asked to define a date and time that suits you. At that point you will also be able to select Restart now to reboot your computer immediately.
Preventing Automatic Download of Updates in Windows 10
Unfortunately there is no setting that prevents Windows 10 from downloading updates automatically whenever they become available. So, we will trick Windows into thinking that our internet connection is a metered connection, since the system doesn’t download updates automatically when it detects a metered connection. Then, you will be able to download the updates manually whenever you wish.
Step 1: Go to Settings
Open the Start menu and select Settings.
Step 2: Select “Network & Internet”
From the Settings window, select the Network & Internet option.
Step 3: Go to Advanced Options
From the window you’re currently in, select Advanced Options- it’s located under the list of available Wi-Fi networks.
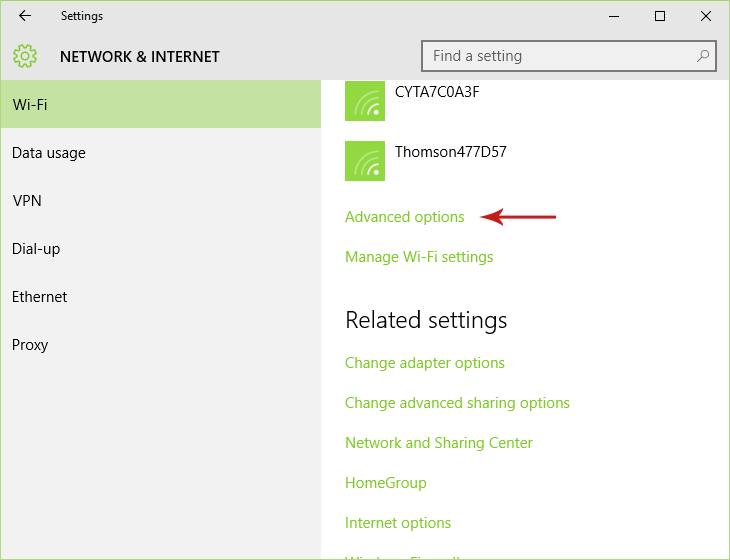
Step 4: Set Your Connection as Metered
Enable the Set as metered connection option and you’re good to go.

Now if you go to the Windows Update settings screen [open Start menu > Settings > Updates & security > Windows Update] you will see the following message:
Updates are available. We’ll download the updates as soon as you connect to Wi-Fi, or you can download the updates using your data connection (charges may apply). Your mobile operator may also require Wi-Fi for some updates.
Below this message there will be a Download button, which you can click whenever you want to download the available updates.
Configuring Windows Updates by Using Group Policy
There is a hidden setting in Windows 10 that allows you to configure how Windows Updates are downloaded and installed. We’ll first configure this setting by using Group Policy, and then by tweaking the registry. Note that this tweak works only in Windows 10 Pro and Enterprise editions only. Hopefully a way to configure Windows Updates in Windows 10 Home will be found soon.
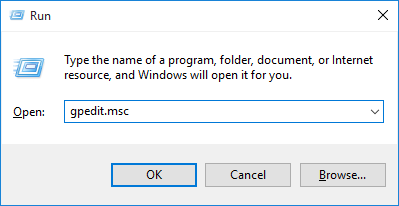
Step 1: Open the Local Group Policy Editor
Press Win + R (“Win” is the Windows key in your keyboard) to open the Run dialog box, type “gpedit.msc” (without quotes) and press enter. This will bring up the Local Group Policy Editor. If you are prompted by UAC, click Yes.
Step 2: Navigate to Windows Updates’ Policy Directory
In the left pane of the Local Group Policy Editor go to the following location:
Computer Configuration\Administrative Templates\Windows Configuration\Windows Updates
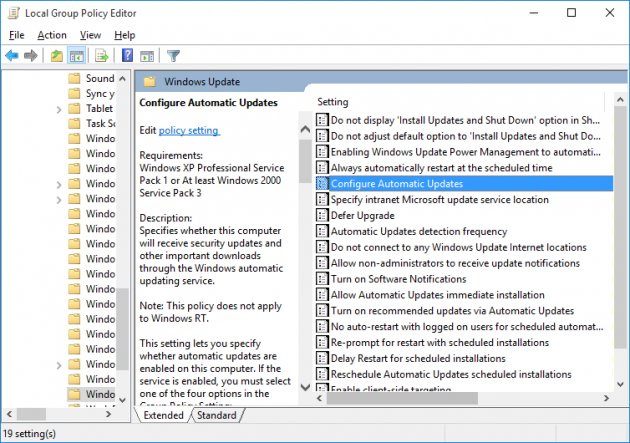
Step 3: Edit the “Configure Automatic Updates” Policy
Locate the “Configure Automatic Updates” policy on the right pane, and double-click on it to open up a window. There, select the Enabled setting (located at the top left part of the window), and then select the desired configuration for Windows Updates from the dropdown menu under the Configure automatic updating option. The available options are:
2 - Notify for download and notify for install
3 - Auto download and notify for install
4 - Auto download and schedule the install
5 - Allow local admin to choose setting
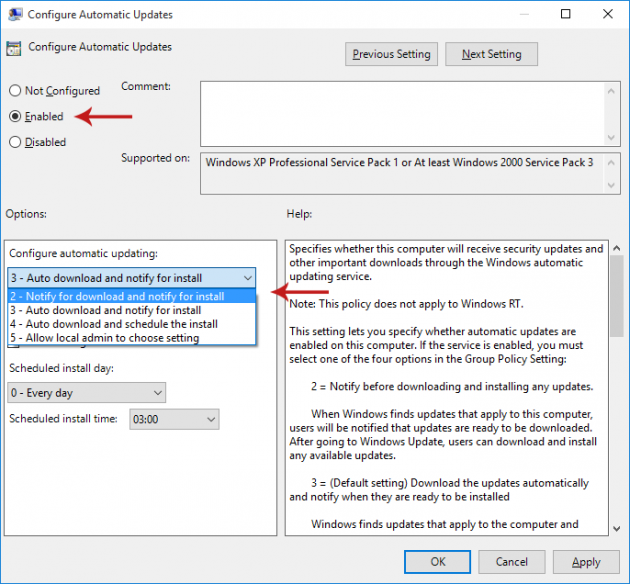
You can view information about each setting on the right part of the window, under Help. Note that the last option (5) gives you the ability to select which setting (2, 3 or 4) you want to apply in the Windows Update settings screen, which is quite useful for changing between configurations without using the Local Group Policy Editor every time.
Pick the one you want to apply, and select OK. Now if you go to the Advanced Options in Windows Update [open Start menu > Settings > Updates & security > Windows Update > Advanced options] you will see that your setting has been applied. To revert back to the original setting, just change the policy's status to Not Configured.
Configuring Windows Updates by Tweaking the Registry
This method is the same as the previous one, but now we will configure how Windows Updates are downloaded and installed from the Registry Editor. Note that this tweak works only in Windows 10 Pro and Enterprise editions only.
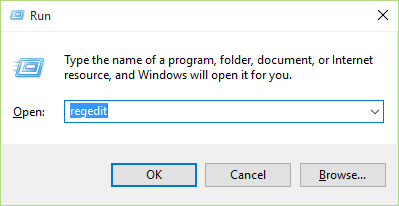
Step 1: Open the Registry Editor
Press Win + R (“Win” is the Windows key in your keyboard) to open the Run dialog box, type “regedit” in it (without quotes) and press Enter to open the Registry Editor.
Step 2: Navigate to Windows Updates’ Registry Key
From the left pane in the Registry Editor, go to the following directory:
HKEY_LOCAL_MACHINE\SOFTWARE\Policies\Microsoft\Windows
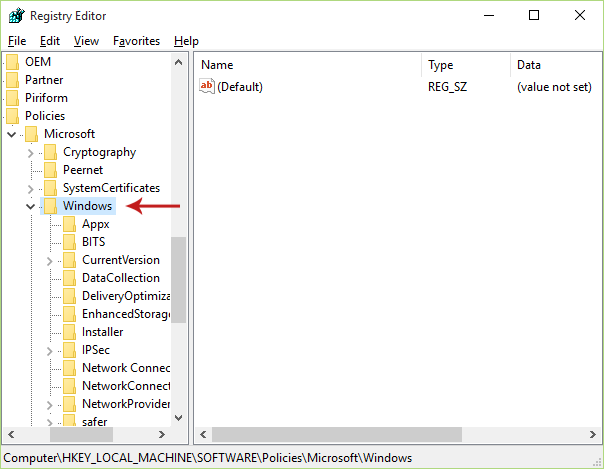
Step 3: Create Two New Keys
Right-click on the Windows registry key (the last key you opened) and select New > Key... to create a new key under it. Rename it to WindowsUpdate.
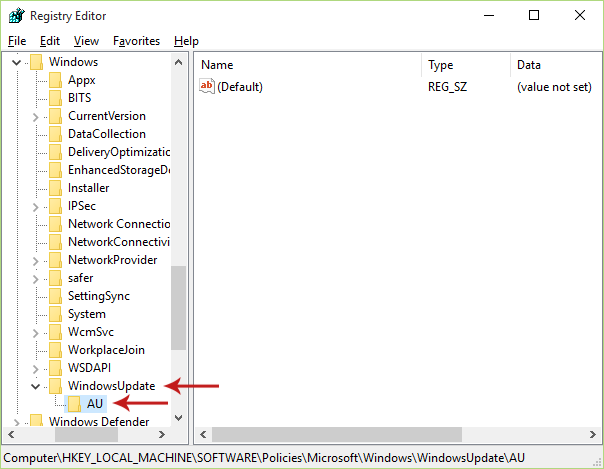
Now create another key under WindowsUpdate named AU.
Now the final key path you are supposed to navigate to is:
HKEY_LOCAL_MACHINE\SOFTWARE\Policies\Microsoft\Windows\WindowsUpdate\AU
Step 4: Create a New DWORD Value
Right-click anywhere on the empty space in the Registry Editor's right pane and choose New > DWORD (32-bit) Value. This DWORD will be named as New Value #1 and will have a default value of 0. Rename the DWORD to AUOptions, and then change its value to 2, 3, 4 or 5 depending on what configuration you want apply (right-click on it > Modify... and type 2, 3, 4 or 5 in the Value data box, then click OK) following the table below:
2 - Notify for download and notify for install
3 - Auto download and notify for install
4 - Auto download and schedule the install
5 - Allow local admin to choose setting
Note that the last option will give you the ability to be able to select in the Windows Update settings screen which option (2, 3 or 4) you want to apply. It’s recommended so that you don’t have to tweak the registry each time you want to change settings.
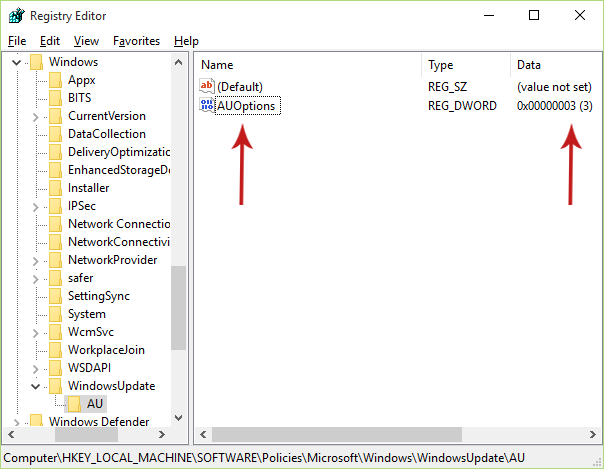
After changing the value’s data, you can go to the Advanced Options in the Windows Update settings page [open Start menu > Settings > Updates & security > Windows Update > Advanced options] and verify that your setting has been applied. To change back to the original setting, just delete the AUOptions registry value you created.
Configuring Windows Updates with Syspectr
You can do all the above settings by simply using Syspectr from O&O. The program comes with a free trial, but after the trial expires you can still use it for Free with fewer functions. 'Hardware and Software Inventory', 'Windows Security', and 'Windows Updates' options remain active in the Free version.
Now you know how to configure Windows Updates, even though Windows 10 itself doesn't include native settings for doing so. Let us know if you have any suggestions or questions in the comments section below!