
How to Turn Off Windows Defender Permanently in Windows 10
Microsoft decided that in Windows 10, Windows Defender should be turned off only temporarily (via the app's settings) or by installing another antivirus program (Windows Defender will automatically detect it and disable itself until the antivirus program is removed). This doesn't leave much room to users who want to disable it permanently without having to install another protection suite though.
In this guide we give you 3 different methods which you can use to turn off Windows Defender permanently:
Method 1: Disable Windows Defender by tweaking the registry.
Method 2: Disable Windows Defender by using Group Policy.
Method 3: Disable Windows Defender by using NoDefender (a third-party app).
The easiest method is Method 3, since it is mostly automated. Note however that if you use that method, then you won’t be able to turn on Windows Defender again (therefore it’s wise to create a system restore point beforehand, in case you change your mind).
Method 1 - Tweaking the Registry
In this method you’ll learn how to disable Windows Defender by making changes in the registry.
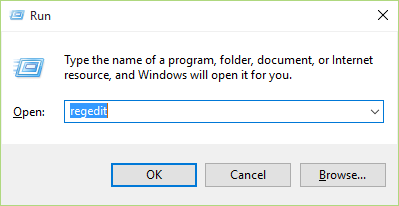
Step 1: Open the Registry Editor
Press Win + R (“Win” is the Windows key in your keyboard) to open the Run dialog box, type “regedit” in it (without quotes) and press Enter. The Registry Editor will appear.
Step 2: Navigate to Windows Defender’s Directory in the Registry
On the left pane in the Registry Editor, navigate to the following directory:
HKEY_LOCAL_MACHINE\SOFTWARE\Policies\Microsoft\Windows Defender

Step 3: Create a New DWORD Value
Right-click anywhere on the empty space in the Registry Editor's right pane and choose New > DWORD (32-bit) Value. This DWORD will be named as New Value #1 and will have a default value of 0. Rename the DWORD to DisableAntiSpyware and change its value to 1 (right-click on it > Modify... and type 1 in the Value data box, then click OK).
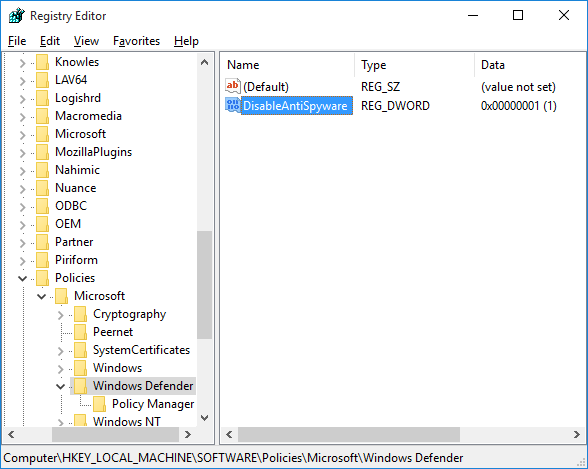
To turn Windows Defender back on, simply change the value of the DWORD to 0 (0: Enabled, 1: Disabled).
Below are two registry files that automatically turn on and off Windows Defender. Simply download and double-click on the one you wish to use:
Method 2 - Using Group Policy
In this method we disable Windows Defender using Group Policy.
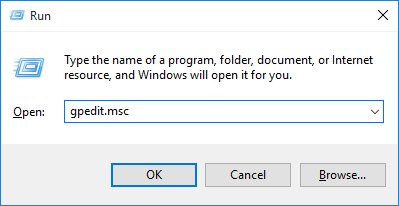
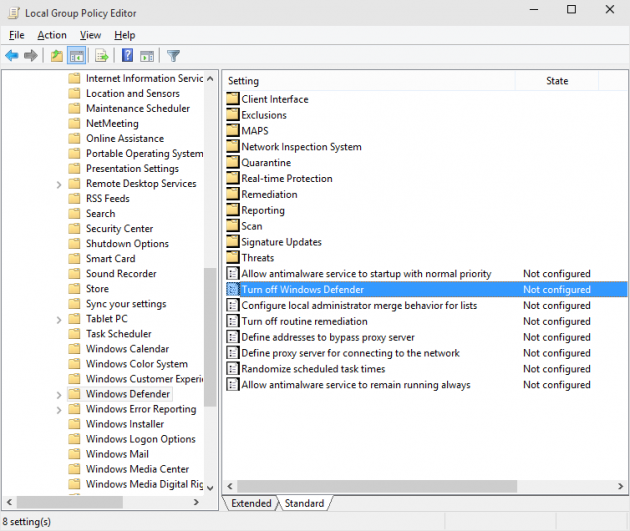
Step 1: Open the Local Group Policy Editor
Press Win + R (“Win” is the Windows key in your keyboard) to open the Run dialog box, type “gpedit.msc” (without quotes) and press enter. This will bring up the Local Group Policy Editor. If you are prompted by UAC, click Yes.
Note: Local Group Policy Editor is not available in Windows 10 Home edition and is only available in Windows 10 Pro and Windows 10 Enterprise editions. Therefore if you have Windows 10 Home, you cannot use this method.
Step 2: Navigate to Windows Defender’s Location
In the left pane of the Local Group Policy Editor go to the following location:
Computer Configuration > Administrative Templates > Windows Components > Windows Defender
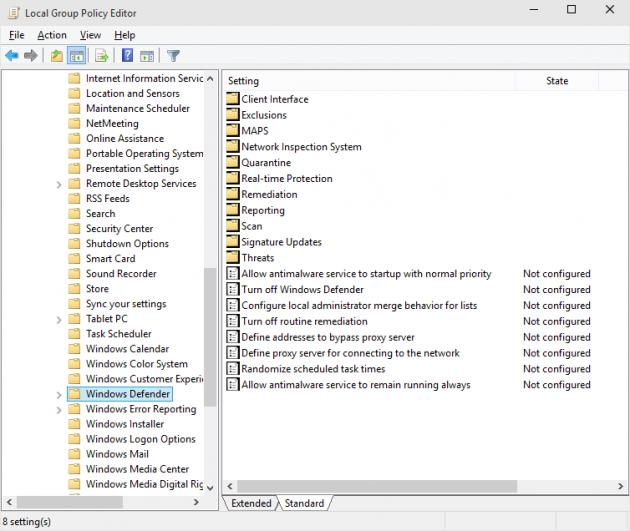
Step 3: Enable “Turn Off Windows Defender” Policy
Once you have gone to the above location, you can see several different items in the right pane of the window. Those items represent policies. So, what we need to do now is locate the “Turn off Windows Defender” policy and double click on it.
In the window that will open, check the “Enabled” option on the left side and click OK.
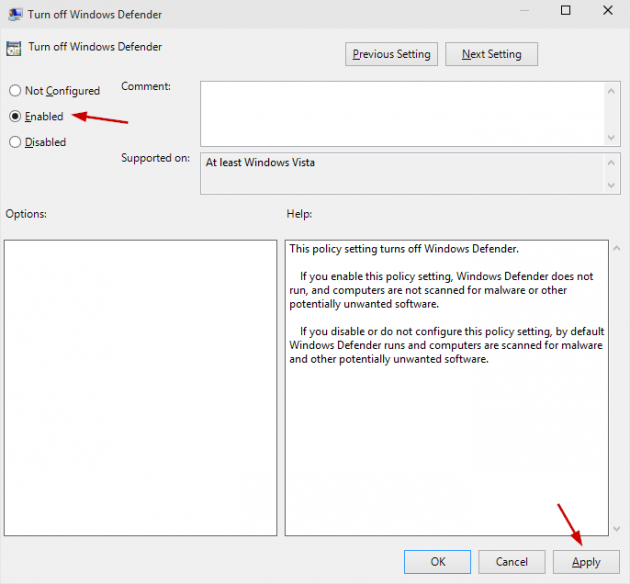
Windows Defender is now turned off. If you wish to turn it back on, simply change the same policy’s status from “Enabled” to “Not Configured” or “Disabled” (both do the same job in this case).
Method 3 - Using NoDefender
In this method we’ll use NoDefender, a third-party app which disables Windows Defender. Keep in mind that you can’t enable Windows Defender after using NoDefender, unless you use a restore point.
Step 1: Download and Run NoDefender
Download NoDefender from here (mirror1, mirror2), unpack it and run it.
Step 2: Disable Windows Defender from its Settings
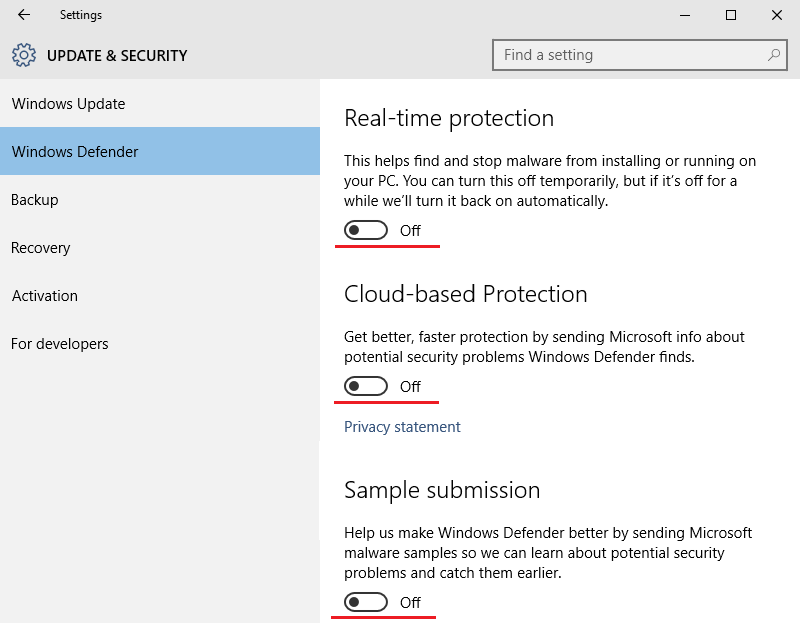
Once you run NoDefender, it will first ask you to go to Windows Defender’s settings and disable Real-Time Protection, Cloud-based Protection and Sample Submission. To reach those settings, simply click on the Open Windows Defender Settings button in NoDefender’s window.

Once you disabled the required options, click Next.
Step 3: Disable Windows Defender
NoDefender’s next screen has a Disable Windows Defender button. Click on it, and wait until the Next button at the bottom right corner is clickable (i.e. when the process is finished).
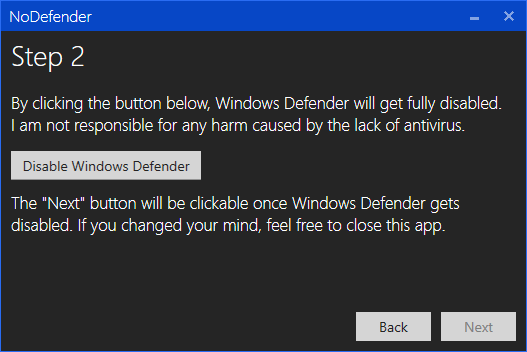
Clicking on it will take you to the last screen, after which you can close the program. Windows Defender is now completely turned off.

Personally, I haven’t installed any protection suite in my Windows 10 machine yet, but I’ll keep Windows Defender enabled in the meantime, since it’s my only line of defense for the time being.
Do you have any alternative ways of turning off Windows Defender? Any suggestions or comments? Let us know!
Now, if you disabled Windows Defender and you feel your system is somewhat exposed, we recommend you test out programs in Sandboxie before installing them on your main OS, or you could even run programs without installing them, from your browser.