
How to Add "Take Ownership" in Context Menu Under Windows 10 (and Vista, 7, 8)
Taking ownership of a file or folder can be really handy when you want to tweak with system settings and such, but the process is somewhat time consuming and might seem a bit complicated to some users. Fortunately there is a solution to those who often use the “Take Ownership” feature so as to do their work fast and nicely: simply add a choice in the right-click context menu that will give you ownership of any item.
This item will give you the ability to take ownership and get full access to a file or folder by right-clicking it and selecting “Take Ownership” from the context menu, without having to perform the whole process manually. And the best part is that it’s really easy to add this context menu option! Sounds great, right?
There are two ways you can add the “Take Ownership” option in the context menu:
Method 1: Add “Take Ownership” Option in Context Menu via Registry Tweaks
Method 2: Add “Take Ownership” Option in Context Menu with TakeOwnershipEx
Both methods work equally well. The first one uses registry tweaks to add the option, whilst the second one requires you to install an additional 3rd-party program called TakeOwnershipEx. Read each method below for more details.
Method 1 - Add “Take Ownership” Option in Context Menu via Registry Tweaks
By using this method you actually have to make some changes in the Registry in order to achieve your goal. But since those tweaks are quite a few, it would be a pain in the back to make them all manually so just use the registry files provided below:
Add ‘Take Ownership’ Option in Context Menu.reg
Remove ‘Take Ownership’ Option from Context Menu.reg
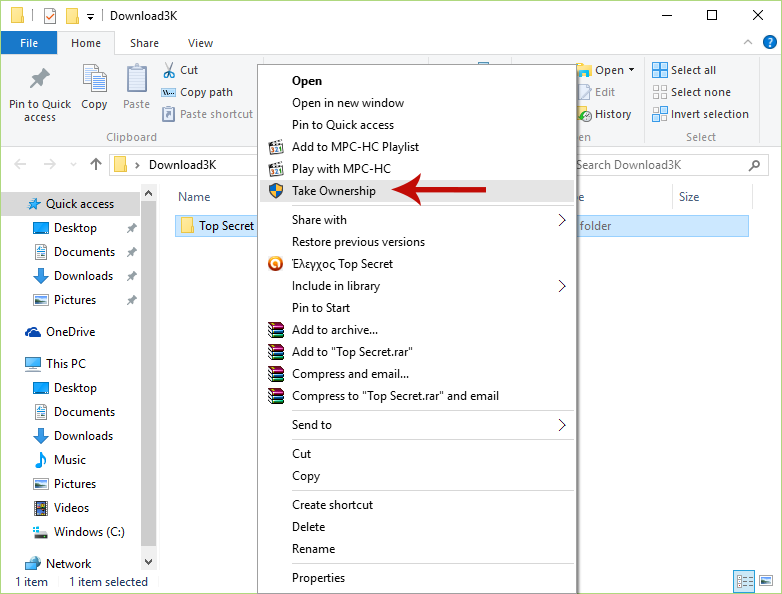
All you have to do is download the first registry file (Add ‘Take Ownership’ Option in Context Menu.reg), double-click on it and click Yes in the confirmation message that will pop-up in order to apply all required registry changes. Then you can try right-clicking on a file or folder and see that the “Take Ownership” option has been successfully added to the context menu.
If you want to remove the “Take Ownership” option from the context menu afterwards, just download the second registry file we provide (Remove ‘Take Ownership’ Option from Context Menu.reg), double-click on it and click Yes in the confirmation message that will pop-up in order to revert all registry changes that were made in the first place.
All credit for the registry files goes to Shawn Brink from TenForums.
Notes
1. If you’re using an administrator account, then you’ll just have to click Yes on the confirmation message that appears after using the “Take Ownership” context menu option.
2. If you’re using a standard user account, then you’ll have to enter a selected administrator’s password after using the “Take Ownership” context menu option. Furthermore, in this case the new owner will be the administrator and not the standard user.
3. You might be prompted for permission by UAC whenever you use the “Take Ownership” option (it depends on your UAC settings).
4. The “Take Ownership” option will not be available to the right-click context menu of application files (e.g. EXE, BAT, MSI). Instead, they will keep their “Run as administrator” option.
5. The above registry files work only under English Windows 10 installations.
6. You can use the provided registry files to add the “Take Ownership” option under Windows 10, 8, 8.1, 7 and Vista.
Method 2 - Add “Take Ownership” Option in Context Menu with TakeOwnershipEx
The alternative method for adding a “Take Ownership” option in the right-click context menu of a file or folder makes use of TakeOwnershipEx, a small utility made by Sergey Tkachenko with the purpose of giving ownership of files and folders to the current user with the click of a button.
Here’s how you can use the “Take Ownership” context menu option with TakeOwnershipEx:
1. Download TakeOwnershipEx from here.
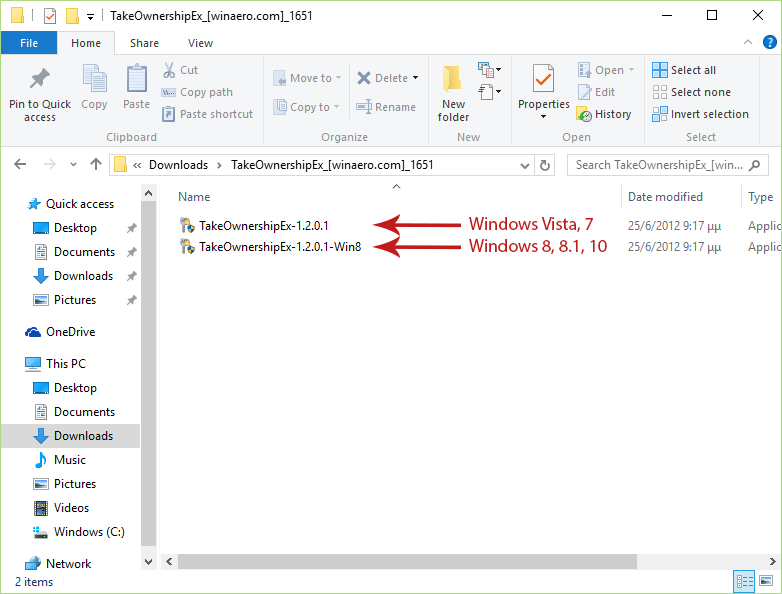
2. Extract the downloaded archive and install the program by running the correct setup package for your Windows:
- TakeOwnershipEx-1.2.0.1.exe - for Windows Vista, 7
- TakeOwnershipEx-1.2.0.1-Win8.exe - for Windows 8, 8.1, 10
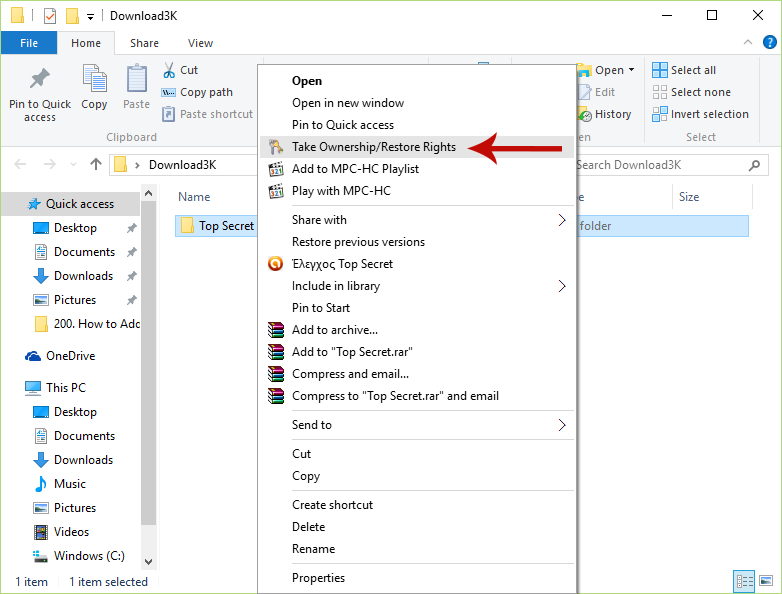
3. When the installation is complete, right-click on a file or folder and select “Take Ownership/Restore Rights” to take ownership with TakeOwnershipEx.
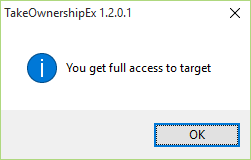
A message will come up saying that "You get full access to target"; click OK and enjoy your ownership.
(Optional)
4. After taking ownership of an item with this tool, you can give it back to the original account afterwards by right-clicking on the same item and selecting “Take Ownership/Restore Rights” again.
You can read more details about TakeOwnershipEx and its usage in this article:
That’s it! Now you can easily take ownership of a file or folder in just a couple of seconds.
Don’t hesitate to let us know your thoughts or problems in the comments section below!