
How to Use Windows Photo Viewer instead of Photos App in Windows 10
Windows Photo Viewer was a really awesome application in earlier versions of Windows, and many users (including me) really miss it in Windows 10. It used to open flawlessly with all supported file types- quick image display, no crashes, efficient file navigation, etc. Fortunately though, those who prefer it over the modern Photos app can still use it, and in this article you'll learn how.
Restore Windows Photo Viewer Using the Registry
Restore Windows Photo Viewer (with Sort Order Fix) Using the Registry
Remove Windows Photo Viewer (Undo Restore)
You can click on any of the links above in order to jump to the corresponding topic in the article, instead of scrolling through it.
Restore Windows Photo Viewer Using the Registry
Step 1: Download and Run Required Registry File
To restore Windows Photo Viewer, you need to download the following registry file first:
Restore Windows Photo Viewer.reg
After you've downloaded it, simply double-click on it to run it. This will enable Windows Photo Viewer in Windows 10.
Step 2: Set Windows Photo Viewer as the Default Application for Opening Image Files
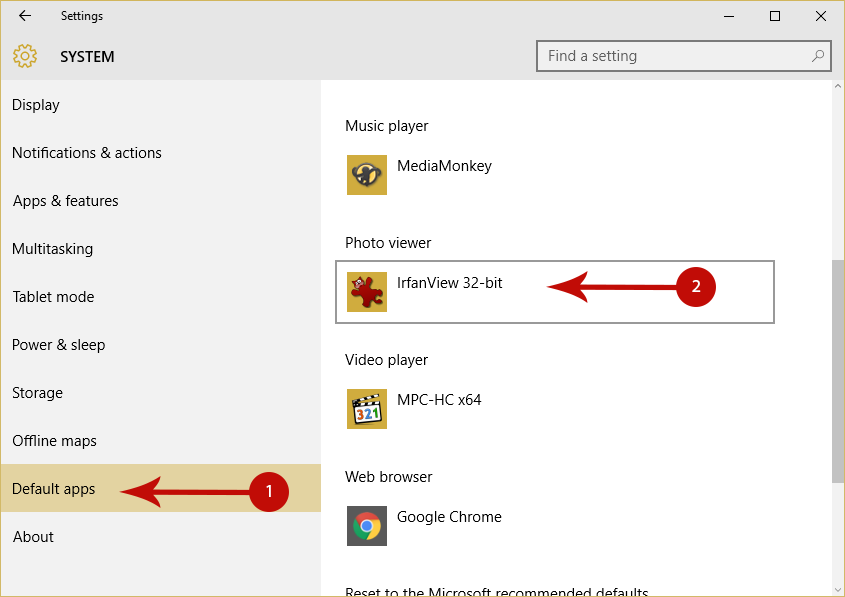
After you've run the above registry file and enabled Windows Photo Viewer, then you can set it as the default program for viewing image files. To do this, go to Settings > System > Default apps and click the button under the Photo Viewer heading in the right side of the window, then select Windows Photo Viewer from the list of available apps.
Now all your images will open with Windows Photo Viewer!
Restore Windows Photo Viewer (with Sort Order Fix) Using the Registry
This method is the same as the previous one, with the only difference that the registry file included here incorporates a fix which allows you to view images in the same order that you arranged them in.
Note: This will list Windows Photo Viewer twice in the Open with > Choose app dialog.
Step 1: Download and Run Required Registry File
Download the following registry file first:
Restore Windows Photo Viewer (with Sort order fix).reg
Then double-click on it to run it, in order to enable Windows Photo Viewer in Windows 10.
Step 2: Set Windows Photo Viewer as the Default Application for Opening Image Files
After you've run the above registry file and enabled Windows Photo Viewer, then you can set it as the default program for viewing image files. To do this, go to Settings > System > Default apps and click the button under the Photo Viewer heading in the right side of the window, then select Windows Photo Viewer from the list of available apps.
Remove Windows Photo Viewer (Undo Restore)
If you have enabled Windows Photo VIewer using one of the methods above, and now you want to undo the restoration (i.e. remove Windows Photo VIewer), then simply download and run the following registry file:
Remove Windows Photo Viewer.reg
Then you can set the Photos app (or any other app of your preference) as the default app for opening image files.
If you have any questions or issues, then let us know in the comments section below and we'll try to help you!
[Credit: Shawn Brink from TenForums]