
How to Turn On "Assigned Access" (Kiosk Mode) in Windows 10
One feature that was introduced in Windows 8 and made it to Windows 10 is “Assigned Access” and if you don’t know what it is, then you probably can’t figure it out either. So let’s see what this feature does and how to enable it.
In a few words, Assigned Access allows you to create one very restricted user account, the only thing you can do with which is run one app from the Store, and nothing else. This means that the whole account is essentially locked, apart from that one application of your choice, which also runs in full screen only. You can imagine that this extremely useful during presentations and kiosks, where you don’t want the public to peek at your desktop or other stuff you have. That’s why assigned access is also called Kiosk Mode.
Turning On “Assigned Access” in Windows 10
As I said above, assigned access basically takes over a user account and restricts it to running one Store app only, in full screen. So you can tell that we must create a new user account first, and then enable the assigned access feature to it.
Before giving the instructions though, it’s recommended to read the following notes first:
Notes
1. You cannot use domain accounts for assigned access.
2. You cannot use Administrator user accounts for assigned access (only standard accounts are allowed).
3. You can only use Store apps only for assigned access, and not Win32 applications.
4. You can only choose one Store app to run for assigned access.
5. When someone signs in with the assigned access account, they won’t be able to see any notifications, switch apps, close the app with gestures, a mouse, a keyboard or hardware buttons.
As you can see there are many limitations in this feature, especially if you consider notes 3 and 4. Not being able to use a set of apps, or a Win32 application that is not included in the Store, are big disadvantages.
Well now you know the details about assigned access, so let's enable it:
Step 1: Create a New User Account
First you must create a new user account that will be used for the assigned access feature. You can read our article for creating user accounts here (it’s recommended to create a new local account in this case).
Step 2: Sign into the New User Account
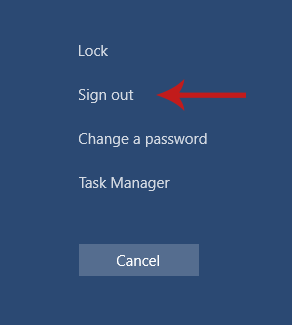
Log out of your current account (hit Ctrl + Alt + Del and select Sign out) and then sign into the new account you just created.
Step 3: Install the App you Want to Use for Assigned Access
In your new account, open the Store app first.
![]()
Then, find and install the app you want to use for assigned access in the Store.
[You can skip this step obviously, if the app you want to use is already installed when you create the account.]
Step 4: Sign Back to the First Account
Now, after you install the app you want to use for the assigned access, log out and log back into the account you were using earlier.
Step 5: Go to Settings and Click ‘Accounts’
Open the Start menu and select Settings.
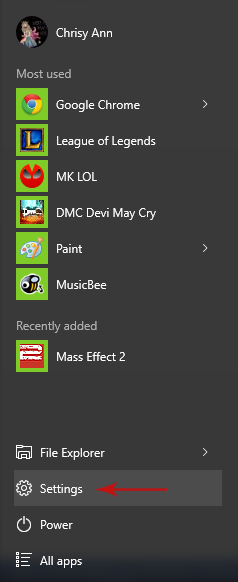
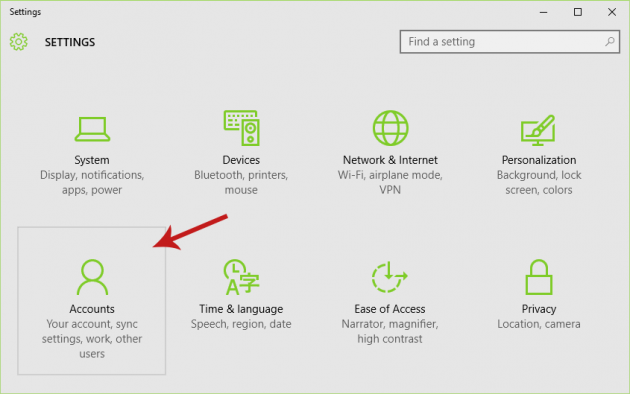
In the Settings screen, click Accounts.
Step 6: Select ‘Set up Assigned Access’ from the ‘Family & Other users’ Menu
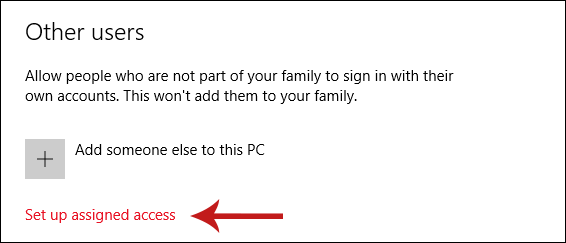
From the side bar on the left select Family & other users then in the main screen click Set up assigned access (located under the Other users heading).
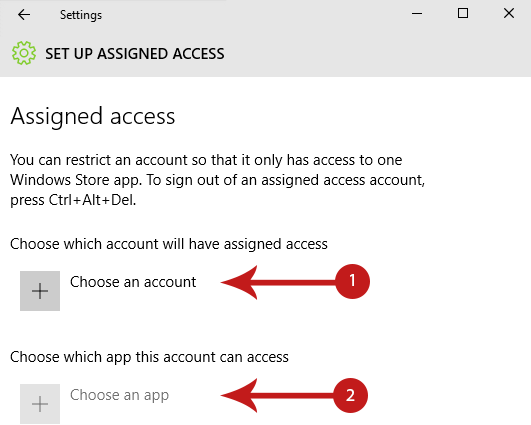
Step 7: Set up the Account and App for Assigned Access
In the current screen you are asked to choose the account and the respective app that you want to use in it for assigned access.
First click on the “Choose an account” button and from the dialog that opens select the account you created earlier. Then click on the “Choose an app” button and from the dialog that opens select the app you want to use.
Step 8: Use the Assigned Access Account
Now you can try signing into the assigned access account again, only that this time you won’t be able to do anything else other than use the app that’s running on the screen.
To exit the account, simply press Ctrl + Alt + Del and you will be signed out. Alternatively, you can quickly hit the Windows key in your keyboard 5 times, something that will restart your PC and allow you to sign in with a different account.
How to Turn Off “Assigned Access” for an Account
If you want to turn off assigned access, the process is really straightforward.
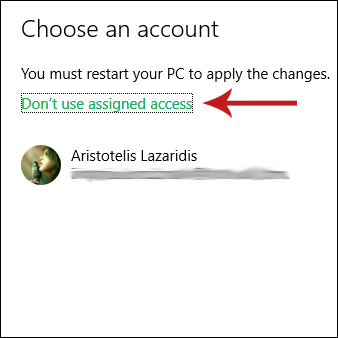
Follow Steps 5, 6, 7 from above to reach the “Set up assigned access” screen and then click the Choose an account button. In the dialog that opens click on Don’t use assigned access. This will disable assigned access.
Now you can stop worrying about someone messing with your computer in your kiosk, or accidentally showing your personal files and websites to the public while you’re trying to prepare the presentation.
If you have any questions or problems regarding Assigned Access (or any other tech subject), post in the comments section below or send us an email! We love hearing your thoughts, and we’ll try to help you out.
I followed all the above steps for setting up assigned access in windows 10. But my windows store runs fine when this local account is not is assigned access. Once i set this local account to assigned access & restart machine, machine landing in that local accounts sign page (a button with sign in). If i click that sign in button, machine log on to that user account and immediately comes to sign in page again.
It did not work for me.
Any solution ?