
How to Add New Accounts in Windows 10 [Child, Adult, Microsoft and Local Accounts]
You probably have noticed how Microsoft wants to give special focus in the users’ privacy, security and organization in Windows 10. Now, apart from being able to sign in to a Windows 10 device by using either a local account or a Microsoft account, you can also add specific accounts that belong to your family’s members, who can be either children or adults. This part of Windows 10 is known as Microsoft family.
Adult accounts have no restrictions (unlike child accounts) and are able to manage and monitor the activities of child accounts.
A child account can be monitored and managed by the adult accounts so as to make the child’s web experience safer and more enjoyable. Features include activity reporting, web filtering, time limits, app restrictions, game restrictions, phone downloads and requests by child, all of which can be accessed at account.microsoft.com/family.
And of course, you can also add accounts for users who do not belong to your family.
In this article we’ll show you how to add new accounts to your device, which can either be family accounts (child/adult) or non-family local/Microsoft accounts.
For easier navigation, you can click to any of the links below in order to jump to the corresponding topic in the article:
- Adding a Child Account to your Microsoft Family
- Adding an Adult Account to your Microsoft Family
- Adding a Local Account from Settings
- Adding a Microsoft Account from Settings
- Adding a Local Account from Local Users and Groups Manager
- Adding a Local Account by using the Command Prompt
Adding a Child Account to your Microsoft Family
Step 1: Go to Settings
Open the Start menu and select Settings.
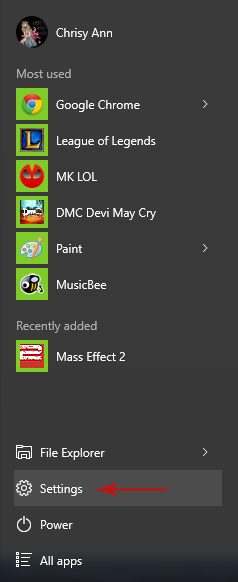
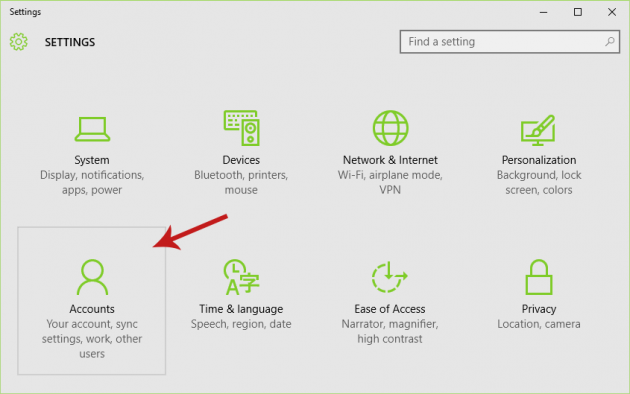
Step 2: Select “Accounts”
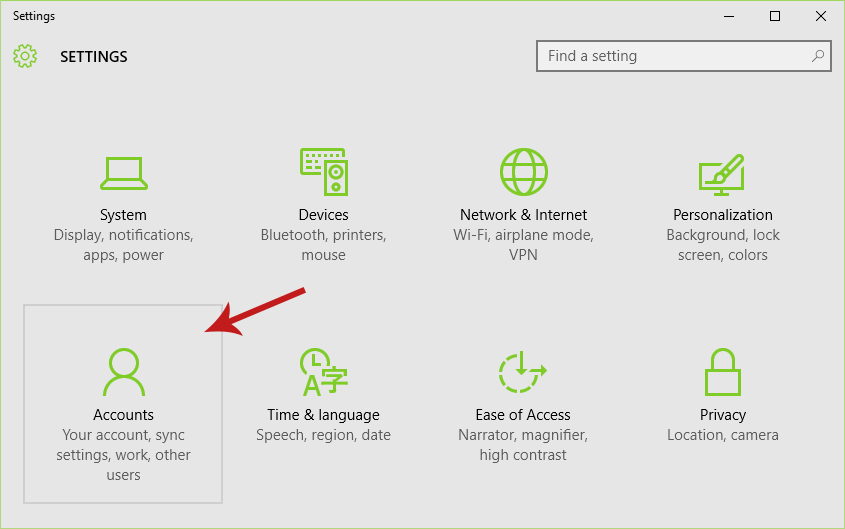
From the Settings window, select the Accounts option.
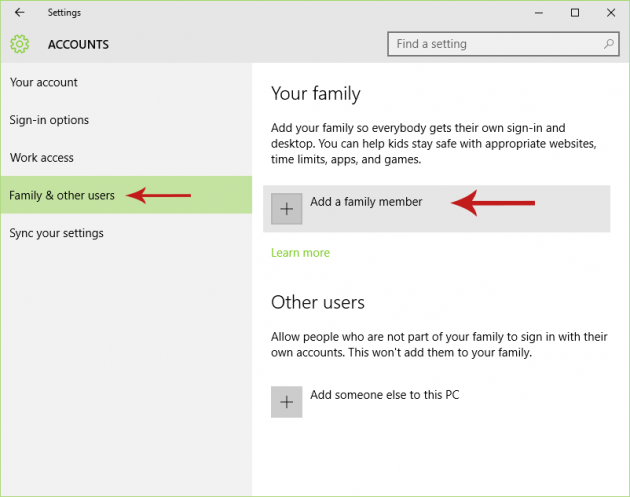
Step 3: Navigate to “Family & other users” and select “Add a Family Member”
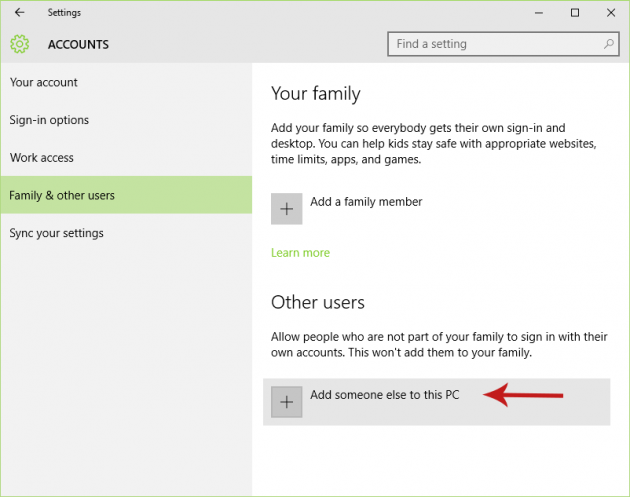
In the Accounts screen, click (or tap) on Family & other users from the sidebar on the left, and then click (or tap) on Add a family member (under Your family).
Step 4: Add a Child
In the window that opens you will be asked whether you want to add a child or an adult, and enter their email address. Select Add a child, type the person’s email address in the textbox and click Next.
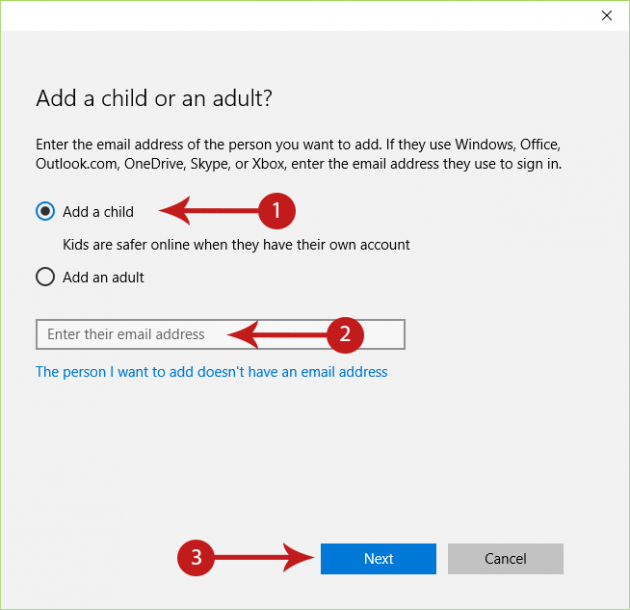
Note: If the person does not have an email address, click on the “The person I want to add doesn't have an email address” link in order to create a new email address and Microsoft account for him first.
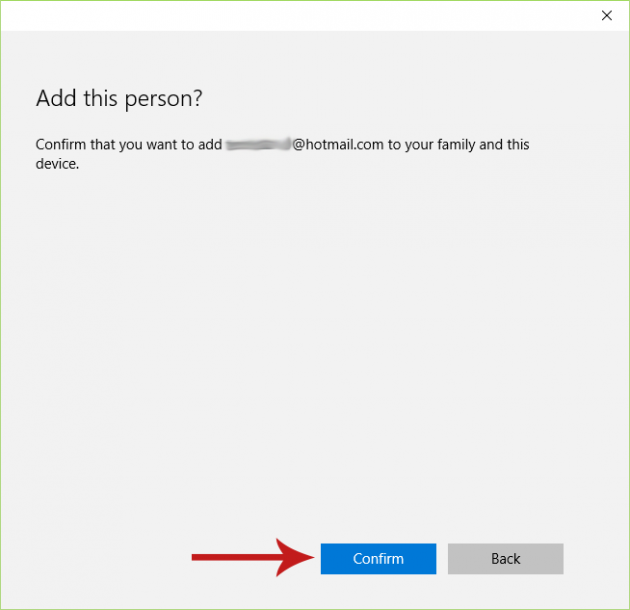
Step 5: Confirm that You Want to Add the Account
In the next screen click (or tap) Confirm to confirm that you want to add that account to your device and family.
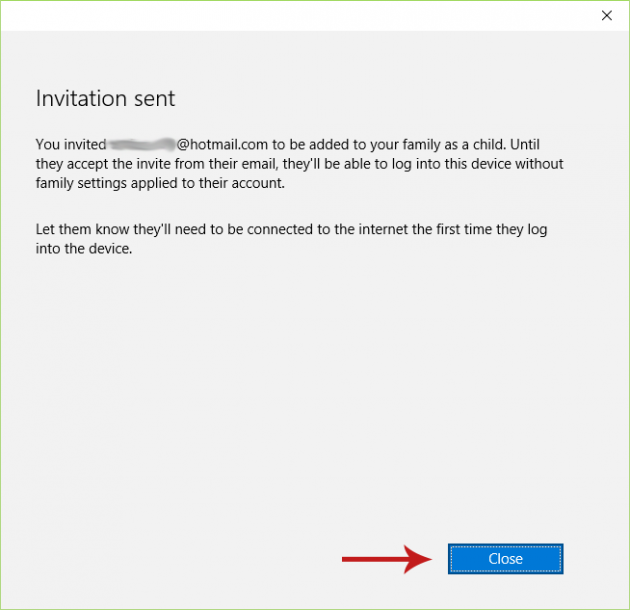
Step 6: Close Window
Your half of the process is now done. You will be notified that the child has been sent an invitation to join your family, which he must accept in the next 14 days (otherwise it will expire).
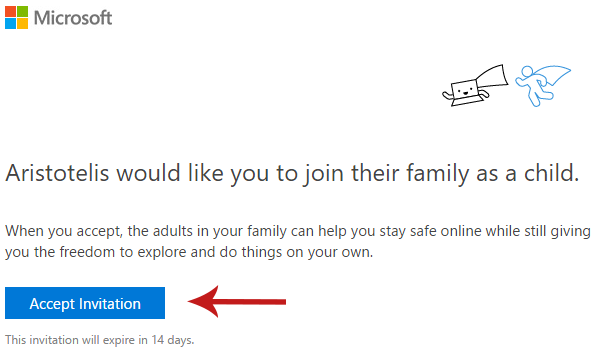
Step 7: Accept Invitation
Now the child must log into their email account, open the email sent from Microsoft Family and click on the Accept Invitation link included in it.
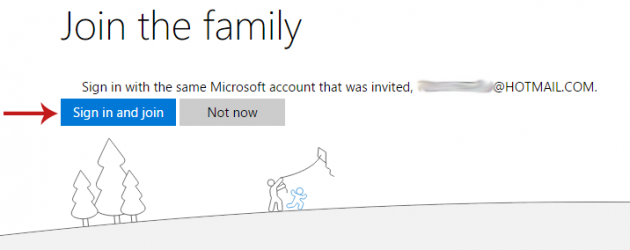
Step 8: Sign in to Microsoft Account
The child will be asked to sign in to their Microsoft account if they are not already signed in when accepting the invitation.
And that completes the process for adding a child account in your Microsoft family and Windows 10 device. The child will be able to see who else is in their family, and the adults will be able to manage the child’s account in Microsoft family. Additionally, the account will be listed in Family & other users of the Accounts screen (as in Step 3).
Adding an Adult Account to your Microsoft Family
Step 1: Open Settings
Open the Start menu and select Settings.
Step 2: Select “Accounts”
From the Settings window, select the Accounts option.
Step 3: Navigate to “Family & other users” and select “Add a Family Member”
In the Accounts screen, click (or tap) on Family & other users from the sidebar on the left, and then click (or tap) on Add a family member (under Your family).
Step 4: Add an Adult
Now you will be asked whether you want to add a child or an adult, and enter their email address. Select Add an adult, type the person’s email address in the textbox and click Next.
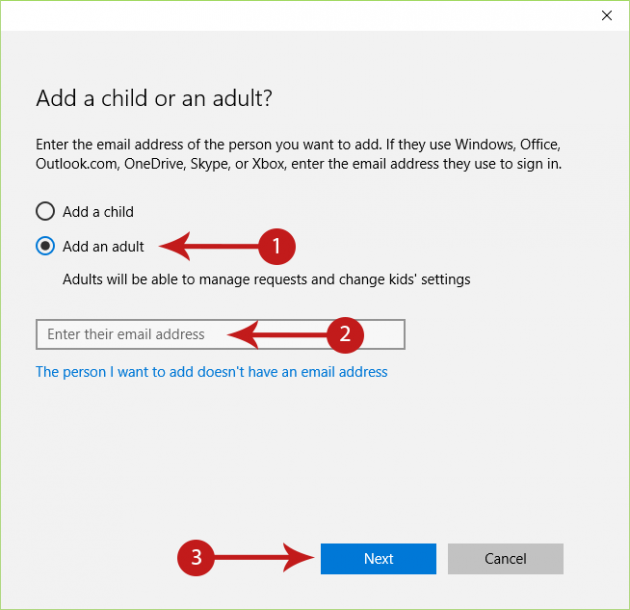
Note: If the person does not have an email address, click on the “The person I want to add doesn't have an email address” link in order to create a new email address and Microsoft account for them first.
Step 5: Confirm that You Want to Add the Account
In the next screen click Confirm to confirm that you want to add that account to your device and Microsoft family.
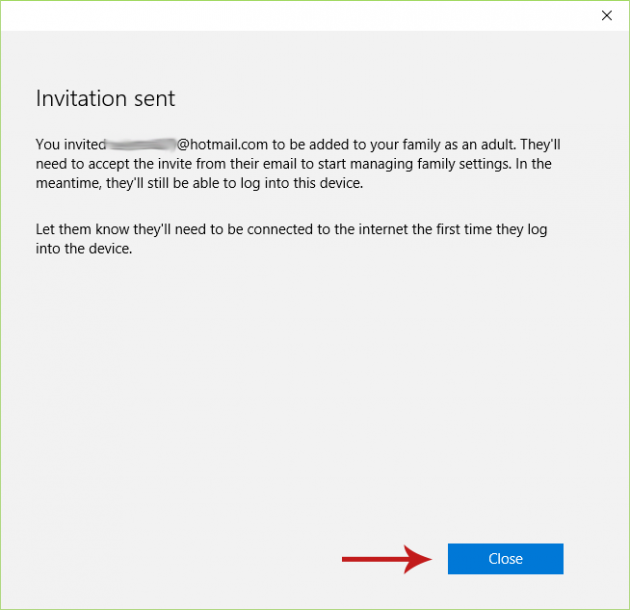
Step 6: Close Window
You will be notified that the adult has been sent an invitation to join your family, which they must accept in the next 14 days (otherwise it will expire).
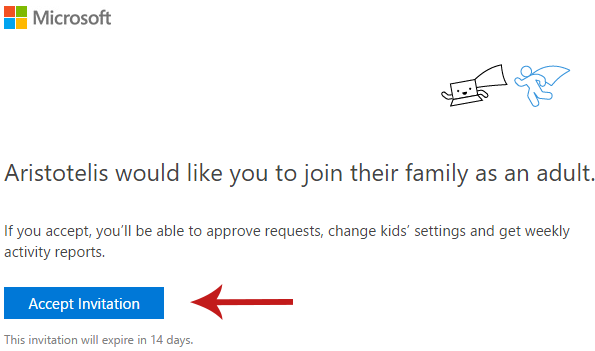
Step 7: Accept Invitation
The adult should check his email from Microsoft family and accept the invitation that is included in it.
Step 8: Sign in to Microsoft Account
If the adult is not already signed into his Microsoft account when accepting the invitation, he will be asked to sign in first.
The adult is now added to your family (you will be able to see him in Microsoft family), and will be listed in Family & other users of the Accounts screen (as in Step 3).
Adding a Local Account from Settings
Step 1: Open Settings
Open the Start menu and select Settings.
Step 2: Select “Accounts”
From the Settings window, select the Accounts option.
Step 3: Navigate to “Family & other users” and select “Add a Family Member”
In the Accounts screen, click on Family & other users from the sidebar on the left, and then click on Add someone else to this PC (under Other users).
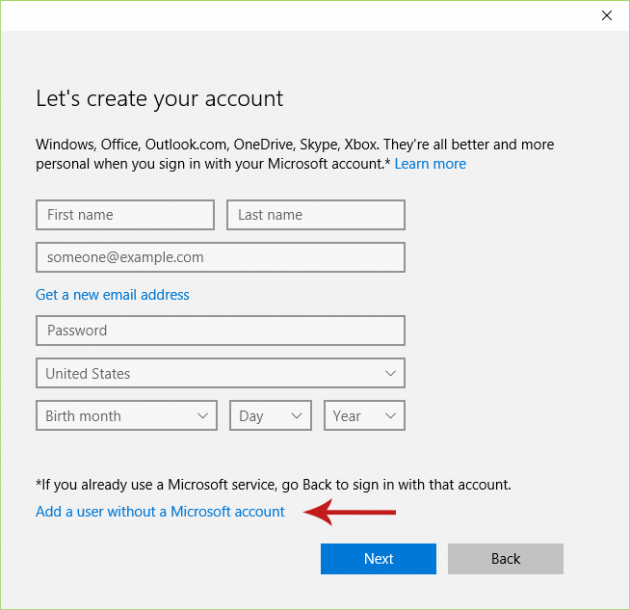
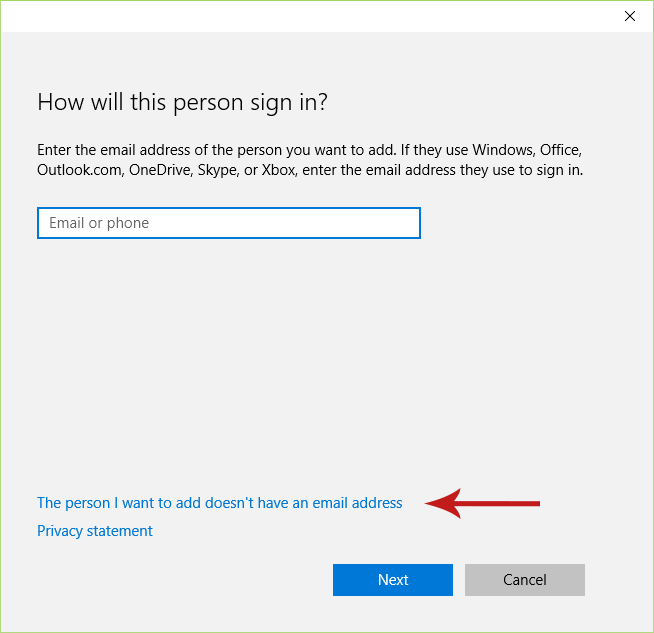
Step 4: Add a Person Without an Entering an Email Address
In the window that opens click on the “The person I want to add doesn’t have an email address” link (located at the bottom).

Step 5: Add a User Without a Microsoft Account
Another window will open which will ask you to enter the details of the person in order to create a Microsoft account for them. But what you have to do here is click on Add a user without a Microsoft account.
Step 6: Create Account for this PC
In the next screen just enter a username and a password for the account you want to create, and click Next.
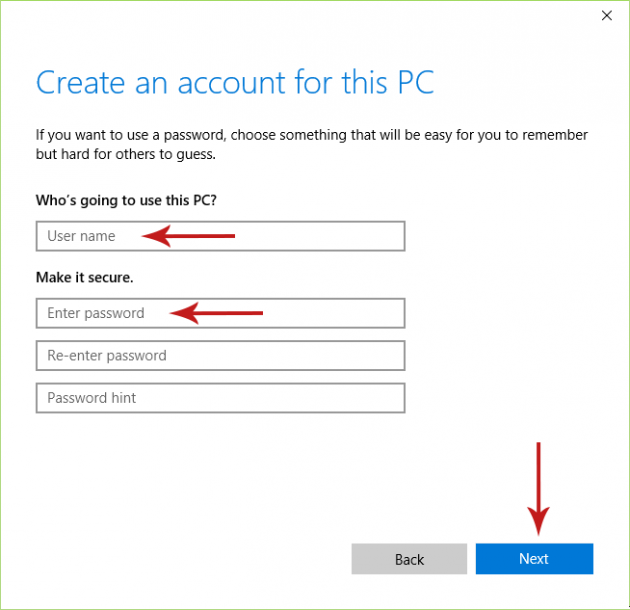
Note: Entering a password here is optional.
This account will be a Standard account, and you can then change it to an Administrator or Guest account.
Adding a Microsoft Account from Settings
Step 1: Open Settings
Open the Start menu and select Settings.
Step 2: Select “Accounts”
From the Settings window, select the Accounts option.
Step 3: Navigate to “Family & other users” and select “Add a Family Member”
In the Accounts screen, click on Family & other users from the sidebar on the left, and then click on Add someone else to this PC (under Other users).

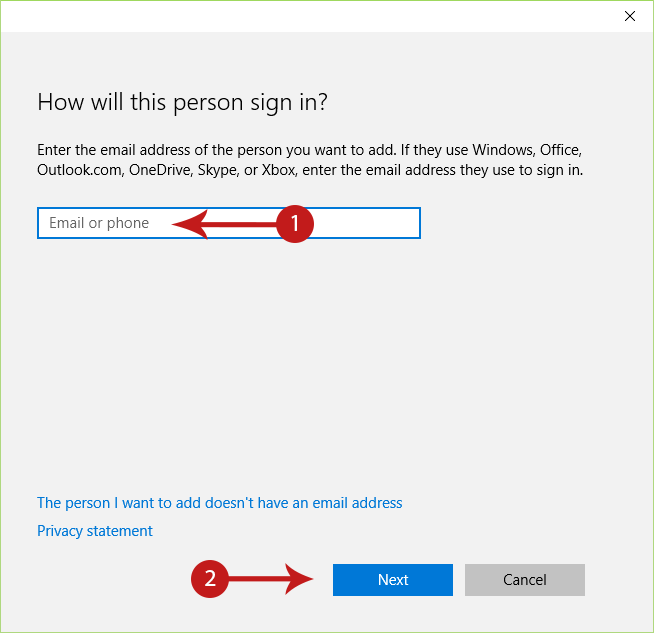
Step 4: Enter Email Address
In the window that opens enter the email address of the person you want to add and then click Next. Now the user will be able to log into your device using their account.
If the person you want to add doesn’t have an email address, click on the The person I want to add doesn't have an email address link at the bottom of the screen and enter his details in order to create a Microsoft account for him. You can either create a new email address for that purpose or use an existing one. Then follow the on-screen instructions to complete the process.
This account will be a Standard account, and you can then change it to an Administrator or Guest account.
Adding a Local Account from Local Users and Groups Manager
Note: Local Users and Groups Manager is not available in Windows 10 Home edition and is only available in Windows 10 Pro and Windows 10 Enterprise editions. Therefore if you have Windows 10 Home, you cannot use this method.
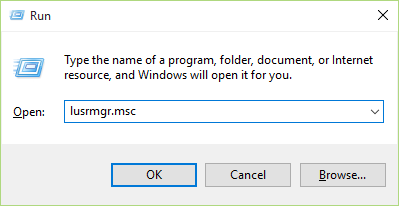
Step 1: Open Local Users and Groups
Press Win + R (“Win” is the Windows key in your keyboard) to open the Run dialog box, type “lusrmgr.msc” (without quotes) and press enter. This will bring up Local Users and Groups Manager.
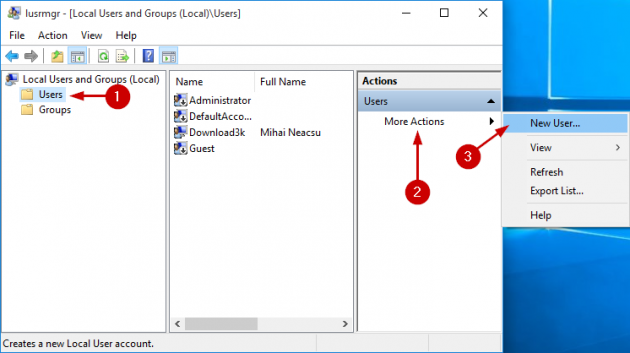
Step 2: Create New User
Select the Users folder from the pane on the left, and then click on More Actions > New User from the pane on the right.
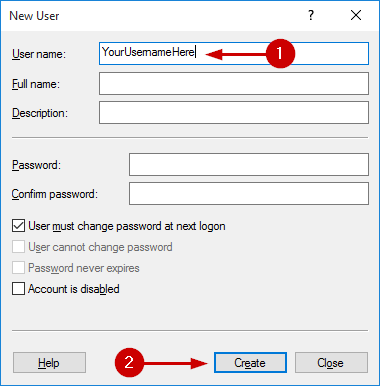
Step 3: Enter the User’s Details
A new window will open, in which you have to enter the details of the user account you want to add. The only obligatory field you have to fill in is the User name field; all the other fields (full name, description, password) are optional. There are also a few options you can configure as well. When you are done, click Create and then click Close- the new local user account has been created.
This account will be a Standard account, and you can then change it to an Administrator or Guest account.
Adding a Local Account by using Command Prompt
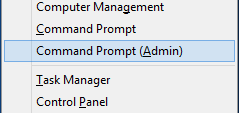
Step 1: Open an Elevated Command Prompt
Press Win+X and choose Command Prompt (Admin) to open an Elevated Command Prompt.
Step 2: Enter Command to Create New Local Account With and Without Password
- To create a new local account without password:
Type/paste the following command in the Command Prompt and press Enter to create a new local account, but replace Username with the username you want to give to that account:
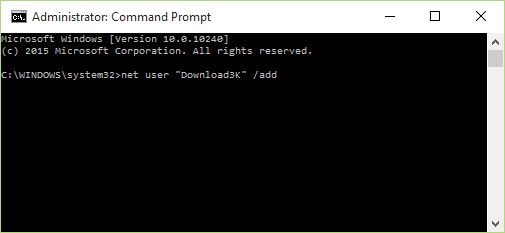
net user "Username" /add
For example, to create a new local account with the username Download3K, the command would become:
net user "Download3K" /add
- To create a new local account with password:
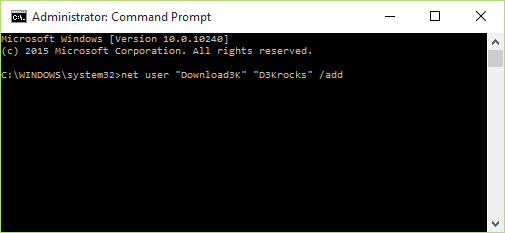
If you want to create a new local account with a password, enter the following command instead, and replace Username and Password with the username and password you want to give to that account:
net user "Username" "Password" /add
For example, to create a new local account with the username Download3K and password D3Krocks, then the command would be:
net user "Download3K" "D3Krocks" /add
This account will be a Standard account, and you can then change it to an Administrator or Guest account.
If you have any questions or problems, post in the comments section below and we'll try to help you out!
[Credit: TenForums]