How to move Pagefile.sys and Swapfile.sys to another drive in Windows 8/8.1 or 10
Pagefile.sys is Windows' virtual memory swap file that it will be used when applications need more RAM than you have available. At that point Windows will start using your hard disk as "virtual" memory, via Pagefile.sys. If the pagefile is set to be managed automatically by Windows, it usually has the same size as the RAM you have installed, unless you have Hibernation active, in which case Pagefile.sys will have around 30% of your RAM size.
Swapfile.sys exist in order to suspend and resume Universal apps, which were introduced in Windows 8. It's similar to Pagefile.sys and usually occupies 256 MB in size.
At some point, for performance or disk usage reasons, you might want to move these 2 files to another location, preferably to another drive. Users getting a new SSD drive sometimes prefer to move the swap files to a regular HDD, or keep a small pagefile on the SSD and a bigger one on the regular HDD in order to minimize the writing cycles on their SSD.
In this tutorial we'll show you how to move both Pagefile.sys and Swapfile.sys to another drive. You will need administrator privileges to performs this action so have your admin credentials ready.
Some things to consider
- You need to move the files to a different physical drive. Moving them on a different partition on the same drive will most likely slow things down.
- You should not move them to an external drive (USB). These are often slower than the internal drives and thus affection performance, and besides that, you can accidentally unplug them causing your PC to crash.
- If you have a second internal drive, that's where you can move these swap files.
- Before proceeding with the tutorial, make sure your hidden system files are visible.
Moving Pagefile.sys to another location/drive
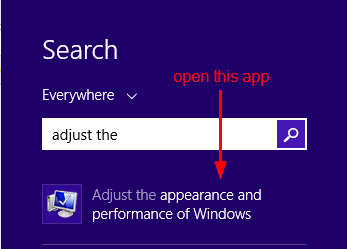
Step 1. Open Performance Options by opening the search Ctrl+S and typing adjust the appearance and performance of Windows.
or Step 1.1. Press Ctrl+X, choose System, click Advanced System Settings on the left, click Settings under Performance.
or Step 1.2. Press Win+R (or Win+S), enter SystemPropertiesPerformance.exe, press Enter.
or Step 1.3. Press Win+E (opens Explorer), with the Ribbon active (Ctrl+F1 to toggle the ribbon) click System properties in the Computer tab, click Advanced System Settings on the left, click Settings under Performance.
or Step 1.4. Press Win+R, enter control sysdm.cpl,,3, press Enter, click Settings under Performance.
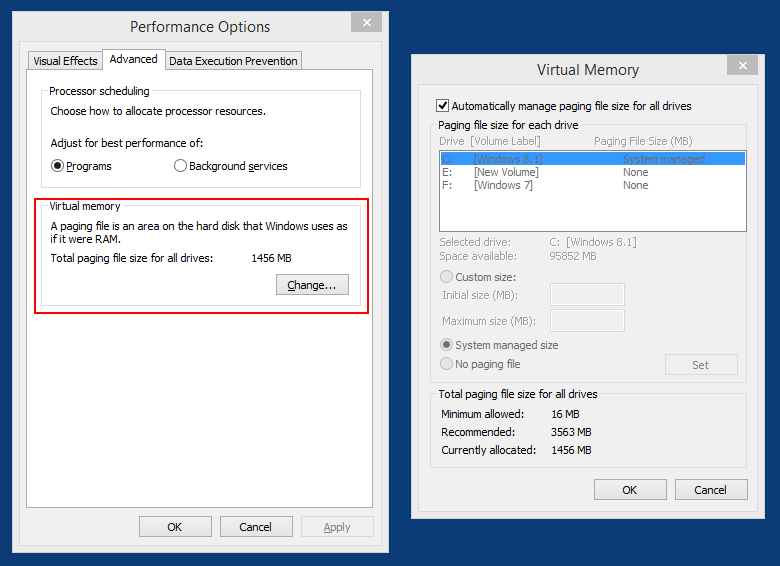
Step 2. Go to the Advanced tab. You will notice under Virtual memory the paging file size currently allocated.
Step 3. Click on Change and you'll see the Virtual Memory window from above, right. By default the pagefile is managed by Windows automatically, allocating 30% or 100% (depends on whether you have Hibernation enabled or not) of your RAM's size to it, under the same partition where your Windows 8 is installed.
You'll notice in the picture that my setup consist of partition C with Win 8 installed on it, partition F with Win 7 on it, and partition E. C and F are actually on the same disk, since I have Win 8.1 and 7 on dual boot. Partition E is on a different disk and this is where I'll move the paging file Pagefile.sys.
Step 4. Uncheck Automatically manage paging file size for all drives.
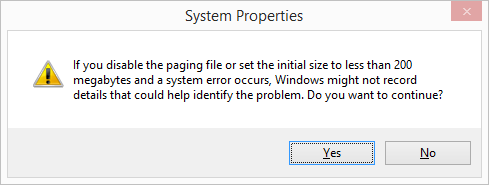
Step 5. Click on the partition with pagefile allocated, click No paging file, click Set. In my case, I do this for partition C. You'll get the warning below, click Yes.
At this point, paging file is disabled entirely on all drives, and Windows relies on your RAM only. Doing a restart at this point will result in pagefile.sys and swapfile.sys being deleted from your disk. Don't restart just yet though.
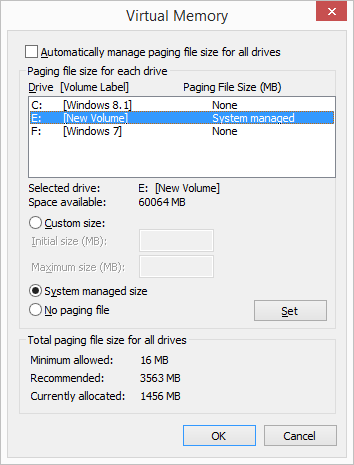
Step 6. While still being inside the Virtual Memory window, click on the partition you want to move the pagefile to and select either System managed or Custom size. Click Set and Ok.
In my case, I selected partition E and set paging to System managed. The end result looked like below.
A new pagefile.sys file appeared on E right away.
Step 7. Save all work in progress and Restart.
You'll notice the initial pagefile.sys is no longer present on the original partition, in my case partition C. That's it for Pagefile.sys.
Moving Swapfile.sys to another location/drive
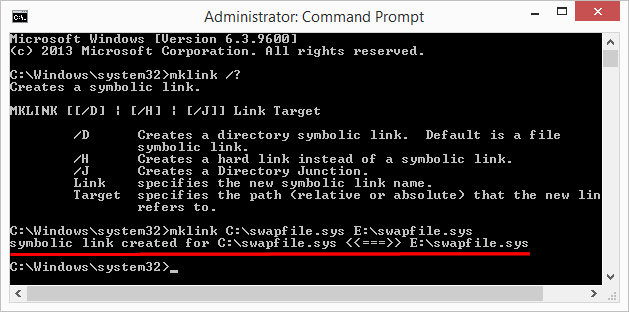
Swapfile.sys does not move along with Pagefile.sys when doing the steps above, so we'll use a workaround. We'll create a symbolic link using the Windows command Mklink (explained in detail here) to point the C:\swapfile.sys to another partition. C:\swapfile.sys will be the symbolic link, small in size, which will point to E:\swapfile.sys, the actual 256 MB swap file. After the link is created, Windows will use the actual file at E:\swapfile.sys as virtual memory.
Go through Steps 1 to 5 from above. Basically, you are setting No paging file to all partitions.
Step 6. Restart. You'll notice both pagefile.sys and swapfile.sys are now gone. If not, you can delete them manually.
Step 7. Open an elevated command prompt by pressing Win+X and choosing Command Prompt (Admin). Click Yes if UAC pops up. (more ways to open an elevated cmd)
Step 8. Type mklink location1\swapfile.sys location2\swapfile.sys, in my case mklink C:\swapfile.sys E:\swapfile.sys. (If you want to see all available parameters for the mklink command, type mklink /?)
You'll get a clear confirmation message: symbolic link created for C:\swapfile.sys <<===>> E:\swapfile.sys.
The target file E:\swapfile.sys does not have to exist when typing the command, it will be created automatically when Windows will look for it on C:\swapfile.sys, where the symbolic link is.
Step 9. Enable pagefile again with step 6 from the first tutorial above, or make any other virtual memory setting you want to do there, as long as you have pagefile active on a drive.
Step 10. Restart. That's it. You'll now have a swapfile.sys (0 bytes) symbolic link at the original location and a 256 MB swapfile.sys at the new location.
To remove the symbolic link, simply delete it and restart in order for the OS to create the swapfile.sys file again.
How about Hiberfil.sys? Can it be moved to another drive?
In case you are wondering if you can do the same trick as above, with hiberfil.sys (the hibernation file) using mklink, you're out of luck. You can only disable it, not move it because, when present, hiberfil.sys is needed much earlier in the OS boot sequence. At that point in the boot sequence, the OS is not able to understand symbolic links, so the only place it will look for hiberfil.sys is on the OS root drive.
When using a SSD drive, booting is actually quite fast compared to an old regular HDD, so disabling the hiberfil.sys file altogether will not lead to a visible decrease in boot up speed. We've also covered deleting Pagefile.sys and Swapfile.sys in a different tutorial.
Thank you so so much! I was able to restore all, System Protection, Hibernation, pagefile.sys and swapfile.sys after I'd partitioned out with Disk Manager. :)

