
How to add Safe Mode as a Boot option to the "Choose an operating system" screen in Windows 8, 10
Booting Windows in Safe Mode is sometimes required in order to troubleshoot various problems. In this tutorial we'll show you how to duplicate your existing OS boot entry in the boot configuration file, then change the duplicated boot entry to use the Safe mode parameter, or Safe mode with networking, or Safe mode with Command prompt, and make those settings permanent. In the end, this will result in a dual-boot-like setup of your OS. At boot, you'll have the option of choosing between your current OS in normal mode or safe mode, as shown below.
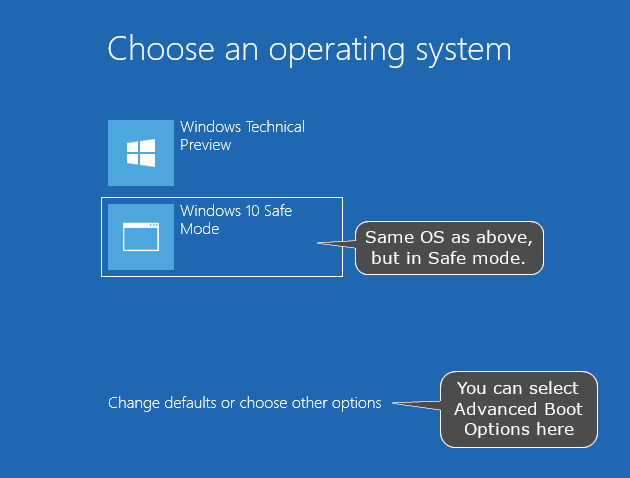
A bonus is that, by using this trick, in Windows 8 and 10 you'll also be able to access the Boot Options menu at boot, just like you would if you were having multiple operating systems installed. I'm talking about the method Launch Boot Options Menu from "Choose an Operating System" screen from this tutorial: How to access the Boot Options menu in Windows 8 and 10. This comes in handy if you can't boot Windows normally, don't have a Windows recovery or installation USB/DVD, and the automatic boot to Advanced options doesn't kick in after Windows fails to load properly a few times in a row. If Windows is stuck into a restart loop and you don't have anything else to troubleshoot it, but you do have this Safe mode at boot set up, you can then access advanced booting options at boot and choose Reset Windows, Restart Windows, or get a Command prompt up.
But enough with the added perks, let's see how to create the Safe mode option inside the BCD Store (Boot Configuration Data Store).
We'll use a simple console command to duplicate the existing Operating System entry and then use msconfig.exe to alter the duplicated OS entry's behavior. If you're not comfortable using a command prompt to mess with boot configurations, you can use EasyBCD (review, download), which provides a GUI for modifying bootloaders flawlessly.
Step by step guide
1. Open an elevated command prompt. An easy way to do this is by pressing Win+X and selecting Command Prompt (Admin). Note that a regular command prompt will not work in this tutorial.
2. Type the following command, then press Enter.
bcdedit /enum /v
This will list all operating system entries from the Windows BCD Store.
3. Under the Windows Boot Loader section, look for your current OS identifier, as shown below.

Finding the description of your OS will help, as the identifier is a few lines above it. In my case it's Windows Technical Preview with the identifier {91639deb-6bdf-11e4-a1b0-dce414cf7bae}.
4. Copy your identifier. Right-click inside the cmd > mark > select the identifier > Enter.
5. Type the following command, if you plan on adding a Safe mode entry:
bcdedit.exe /copy {your identifier number} /d "Windows 10 Safe Mode"
You can right-click inside the command prompt and choose Paste in order to paste the identifier you copied in the previous step.
/d stands for Description, and you can use any description you want. In my case this will be:
bcdedit.exe /copy {91639deb-6bdf-11e4-a1b0-dce414cf7bae} /d "Windows 10 Safe Mode"

If you wish to add a Safe mode with Networking entry, adjust the description accordingly. For example:
bcdedit.exe /copy {your identifier number} /d "Windows 10 Safe Mode w/ Networking"
Likewise, if you plan to add a Safe mode with Command Prompt entry, you could use:
bcdedit.exe /copy {your identifier number} /d "Windows 10 Safe Mode w/ Command Prompt"
6. Close the command prompt and open msconfig.exe. You can do this by pressing Win+R, type msconfig.exe, then press Enter.

Or use the Search (Win+S) and type msconfig.exe, then select System Configuration from the list of results.
7. In the System Configuration window, go to the Boot tab. You will find the newly added entry there. Select it and check the boxes Safe boot and Make all settings permanent.

Pay attention to the Timeout box as well. This is the amount of time you will have to choose between operating systems at boot.
Click OK and confirm by clicking Yes in the next popup window. A restart is required, although you can postpone it.

By default, Safe boot > Minimal is selected. This means booting in Safe mode.
If you want to boot in Safe mode with Command Prompt, you need to select Alternate shell instead of Minimal.
For Safe mode with Networking, you need to select Network.
That's all. You now have a Windows in Safe Mode option at boot.
Tip: If this new boot menu is not convenient for you, you can get back the old, simple, DOS-looking boot loader, with this guide: How to bring back the old 'Choose an operating system to start' boot menu in Windows 8 and 10.