How to Use DISM in Windows 10
If you've noticed that Windows 10 is slowing down or displaying error messages, you may have already tried to remedy the problem using the System File Checker (SFC) command line utility (if you haven't tried that yet, start there). If the SFC utility is unable to repair the operating system and you've already ensured that all malware has been removed, then the next step would be to try the Deployment Image Servicing and Management (DISM) utility to restore the Windows image to its original state.
The DISM utility made its debut in Windows Vista SP1 and now comes pre-installed on both Windows 8.1 and Windows 10. The purpose of the tool is to repair and properly prepare crucial Windows images like the Windows Setup image, Windows Recovery Environment, and Windows Preinstallation Environment (PE). Perhaps most importantly, the DISM utility is capable of repairing the recovery image within your Windows 10 installation, which is basically a surefire way to restore the performance and functionality of your OS with a like new slate for your PC.
Why Try SFC First?
The System File Checker (SFC) command-line utility scans system files and then attempts to replace any missing or corrupt files with good versions. If the SFC scan results show that errors were found but could not be repaired, this could mean that the Windows image (.wim) file has been damaged or isn't working properly and is not allowing SFC to retrieve the needed replacement files. When that happens you can use the DISM utility to repair the image so that SFC will be able to access and replace the necessary system files from within the newly repaired Windows image.
Create a System Restore Point or Perform a Full Backup
Before we show you how to use DISM in Windows 10, we strongly urge you to create a system restore point or create a complete Windows backup image so that you'll have an exact copy of your current operating system that can be restored if anything goes on. This is a standard yet important precaution you should take whenever you're working with system files or registry files of any kind. With that disclaimer firmly in place, here's are all of the ways you can use the DISM utility to get your copy of Windows 10 working perfectly again:
Step 1 - Use the CheckHealth Command in DISM
The fastest way to determine if the Windows image is corrupt is to utilize the /CheckHealth switch. This simple command takes just a few seconds to finish and although it doesn't actually repair anything or create a useful log, it's a quick and easy way to determine whether the image has an error and whether it can be repaired. To use the /CheckHealth switch, follow these steps:
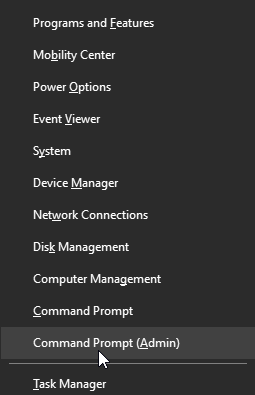
1. Press the Windows key + X to access the Power User menu.
2. Select Command Prompt (Admin) from the menu
3. Type the command below into the Command prompt window and then press Enter:
DISM /Online /Cleanup-Image /CheckHealthStep 2 - Use the ScanHealth Command in DISM
Now that you've done a quick preliminary scan, the next step is to scan the image thoroughly for component store corruption using the /ScanHealth switch. This process will take a bit longer (about 5-10 minutes), but it will create a log file that documents the corruption, so it's a more useful diagnostic tool. Be aware that this process can take a while to start showing progress and may get stuck at 20% or 40% for a while before proceeding, so be patient and let it finish before exiting the command prompt. To use the /ScanHealth switch, follow these steps:
1. Press the Windows key + X to access the Power User menu.
2. Select Command Prompt (Admin) from the menu
3. Type the command below into the Command prompt window and then press Enter:
DISM /Online /Cleanup-Image /ScanHealthStep 3 - Use the RestoreHealth Command in DISM
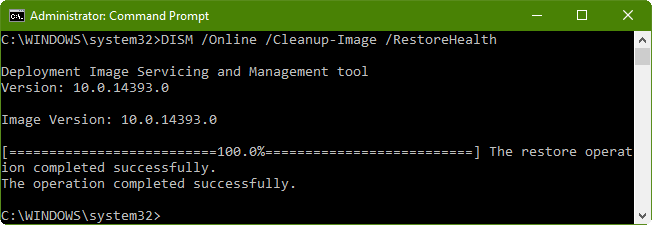
If you've already made a full backup or system restore point and you're prepared for the DISM utility to make repairs and changes to your PC, then running the /RestoreHealth switch would be the ideal course of action. This process will scan the Windows image for corruption, record the results to a log file, and then automatically perform repair operations. Be aware that this process can take anywhere from 10-20 minutes up to a couple of hours to finish. To use the RestoreHealth option, follow these steps:
1. Press the Windows key + X to access the Power User menu.
2. Select Command Prompt (Admin) from the menu
3. Type the command below into the Command prompt window and then press Enter:
DISM /Online /Cleanup-Image /RestoreHealthStep 4 (If Necessary) - Specify a New Source Location When Using RestoreHealth Command
When you use the /RestoreHealth switch, the DISM utility will attempt replace damaged files with good copies using Window Update. However, if the Windows Update component isn't working properly to provide replacement files, then you may need to specify a new source for the good files.
Of course, you'll need a good source for the replacement files, which means you'll need either the Windows 10 installation media/disc that came with your PC or the appropriate Windows 10 ISO file. Fortunately, if you don't have your installation media handy, you can easily download and prepare a Windows 10 installation media ISO using Microsoft's media creation tool. Follow these steps to download the Windows 10 installation media and use it as a new source for file replacements in the /RestoreHealth switch:
1. Download Microsoft's Media Creation Tool.
2. Run the tool after it is downloaded.
3. Follow the instructional wizard to create an ISO file containing installation media for the same edition and version of your Windows 10 operating system. It is extremely important that the ISO contains the same version, edition, and language as your current copy of Windows 10.
4. Mount the newly created ISO image in Windows 10 by double-clicking the ISO file or by right-clicking it and selecting the Mount option from the Context menu. Note: if you've associated ISO files with a third-party app like PowerISO, DAEMONTools, or Virtual CloneDrive then you may need to use that app to mount the ISO to a drive.
5. Once the ISO is mounted, take note of which drive letter it is mounted on, as you'll need that info to set the source path when using the /RestoreHealth switch.
Now that you have the ISO mounted and are aware of which drive it is on and the exact file path, follow these steps:
1. Press the Windows key + X to access the Power User menu.
2. Select Command Prompt (Admin) from the menu
3. Type the command below into the Command prompt window and then press Enter:
DISM /Online /Cleanup-Image /RestoreHealth /Source:ProperWindows10ISO\install.wimNote: In the above command you would replace "ProperWindows10ISO" with the location of the ISO you mounted in the previous step. For example, if you mounted the ISO on your F:\ drive it would look like this:
DISM /Online /Cleanup-Image /RestoreHealth /Source:F:\ISOFileName\install.wimIf you want the DISM utility to disregard the Windows Update files altogether and use only the specified source instead, you can modify the command with a /LimitAccess switch like this:
DISM /Online /Cleanup-Image /RestoreHealth /Source:F:\ISOFileName\install.wim /LimitAccessExtra Step - Run the SFC Utility Three Times After Using DISM
All of the steps above are intended to repair the Windows 10 recovery/installation files. Once that's done you can then use the SFC utility to find and replace problematic system files using the newly repaired image. It's a good idea to restart the PC and rescan with SFC three times, as the utility can sometimes take a few tries to completely fix the issue(s).


