
How to Install Chrome OS on a Laptop/Netbook
 During the past 3 years, Google has been releasing their own line of Chromebooks, but with a limited number of choices and quite expensive price tags, so many users might feel more comfortable installing Chrome OS on their own machines. Here’s a brief tutorial on how to install Chrome OS on your current laptop or netbook.
Chrome OS is a remarkably fine productivity tool for the right user – it boots up very quickly, it moves fast and it is relatively pain-free since Chrome OS is a browser in its core. It also makes it one of the best solutions for netbooks, which are often low on power. You may want to install Chrome OS on your netbook, or you may just want to try it out before you buy a Chromebook; like it or not, you’ll have to do some work to make it happen.
There is no official Chrome OS build on the Internet; Google only makes it available on its Chromebooks; what you can do, however, is download a slightly less polished, but open source counterpart, Chromium OS. This particular guide will be using “Vanilla” build of Chromium OS by Hexxeh, which is quite similar to the original Chrome OS, but takes some work to install and set up. In this tutorial, you will also find out how to install Chromium OS on a live USB stick, as well as install it on your netbook for regular use, or dual-boot it.
Here’s the list of the items you will need:
- A compatible laptop or netbook – sadly, Chromium OS is not compatible with each and every machine; it runs very slowly on some while others have issues with WebCam, Wi-Fi or the trackpad. What you can do is live test it on a USB drive before you choose to commit, but you should know that there is no guarantee it will work perfectly well. For example, Chromium OS does not run on Macs.
- A USB stick, 4 GB – because you cannot burn Chromium OS to a CD, and you can only use a USB dongle to test it out or install it. Find out if your computer can boot from a USB stick, because if it doesn't, you will need Plop Boot Manager Live CD to boot from there, and then, boot from the USB stick.
- Chromium OS Vanilla Build by Hexxeh – this is the image you will burn to your USB stick, and you can get it from a direct download or a torrent. Every day, new builds are coming out with the bug fixes and new tweaks.
- A CD or installation of a working Linux – only those who want to dual-boot their netbooks with Chromium OS to be able to partition your drives and install the boot loader will need this. Ubuntu live CD works just fine.
Download Chromium OS Image
The greatest disadvantage of turning your netbook or laptop into an unofficial Chromebook is that you can only use the unofficial build of Chrome OS. Builds by Hexxeh are by far some of the most popular, and they have their quirks. We recommend Vanilla as the nightly build that gets almost daily updates, but stability varies depending on the device and the build. Lime builds are also great choice if the Vanilla builds are not compatible with your device, but mind Lime has been terminally discontinued.
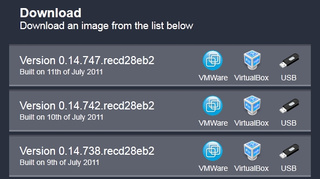
In most cases, you will be able to find a stable Vanilla build that would work with your hardware, but unfortunately it can take you some trial and error, and we suggest you do some searching using your particular device model, but you might as well end up trying a few builds before you get the one that works for you. Some builds might be buggy; some might be incompatible with your hardware. So, go ahead to Hexxeh’s Chromium OS homepage, get the Vanilla build, and then follow through with the next steps.
Create a Bootable Flash Drive
This is where we will be creating a bootable flash drive with a Chromium OS to test it out - this is a very simple process. First, you will need to clear any of the data from the flash drive to format it as FAT32. In Windows, you go to My Computer-> right-click on the drive-> click Format. Download your Chromium build and unzip the image to your desktop.
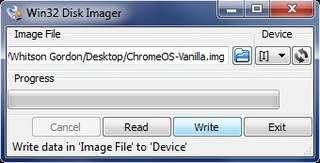
To be able to write the Flow image on your USB stick, you will need Windows Image Writer (D3k mirror). Startup from the program, choose the IMG file from your desktop and press Write. When the process is finished, you get a bootable USB drive you can use to launch Chromium OS.
Boot into Chromium OS
Plug the USB drive into your machine and start it up, or if your system is currently running, restart it to be able to boot from your USB drive. When your computer boots up, hold down the Delete button, or any key your computer is telling you to press down to enter set up. As you enter set up, you will need to find the setting “Boot Priority.” You will need to make the “USB Drive” a primary choice above “Hard Disk,” and reboot your computer. Shortly, you will be able to see the startup screen for Chromium OS.
Before the system boots into Chrome, you will have to choose a wireless network and submit your Google credentials. If the build works fine and your Wi-Fi card is supported, you will be able to boot right into Chrome – there, you will see all your bookmarks, extensions and settings synchronized from your Google account. Easy as that, you can begin trying out Chrome OS right away and see how it blends into your productivity.
One of the most common roadblocks during this step is the Wi-Fi not supported. If this is the case with you, go back and download another build. It might be useful to check out on the web about your particular Wi-Fi card in the previous builds that might have supported it.
Install Chromium OS
If you get to like the Chrome OS, or you would like to try it out for a longer time without having to use the USB stick every time, you can as well install it directly into your system through the following two ways: install Chromium OS as the only operating system, or install it as a secondary operating system to be able to dual-boot it. While the latter option is more time-consuming, it ensures you still have your Windows or Linux previous installation to rely on when Chromium OS is not enough, or if you don’t want to use it anymore.
The easiest way is to install Chromium OS as your main operating system:
boot into Chromium OS from your USB dongle
hit Ctrl+Alt+T to launch the command line
type Install-> hit Enter
In case the interface is asking for a password, type in
facepunch and hit enter.
The process will take a few minutes to complete, and when it’s done, you can remove the USB dongle and boot into Chromium OS by simply turning on your machine. You will also notice that it boots extremely fast. Voil`a! Now, you have your own custom Chromebook.
However, if you want to dual-boot, follow the steps below.
There is a great chance you will not want to give up your existing operation system to Chromium OS completely just yet. If that is the case, you will need to sweat some more, and to think of it – it is a lot easier to simply boot to Chromium OS from a USB dongle, rather than mess up with the dual booting. Nevertheless, if that’s what you want, here’s your guide.
#1 Partition your hard drive
Backup all your data, take the Linux live CD or USB drive mentioned in the introduction and boot into it. Once you are booted, insert your USB dongle containing Chromium OS into your machine, as well.
Here’s how you partition your hard drive. You need two partitions for Chromium OS:
C-ROOT partition for the root OS;
C-STATE partition for your settings and other data.
Go to System -> Administration -> Gparted and select your USB drive from the source menu in the upper left corner. Write down the sizes of your C-ROOT and C-STATE partitions on your USB dongle, as well as the partition reference for each, which would be something like /dev/sdb2.
Next, from the drop down menu, choose your netbook’s main hard drive -> select main partition, which has to have a lot of empty space -> and go to Partition -> Resize/Move. Make it so you that you have at least 3 GB of free space and hit Resize/Move. Next, click on the newly created “unallocated” free space and go to Partition -> New.
Basically, you will need to mirror the partitions from your USB dongle, so if the C-ROOT partition on your dongle is 850 MB, make 850 MB partition on your hard drive. For file system, choose ext2.
Next, click on the remaining of your unallocated space and make another partition, filling up the rest of the space altogether, and for this partition’s file system, choose ext3.
When the process is over, your partition map will look like something on the screenshot.
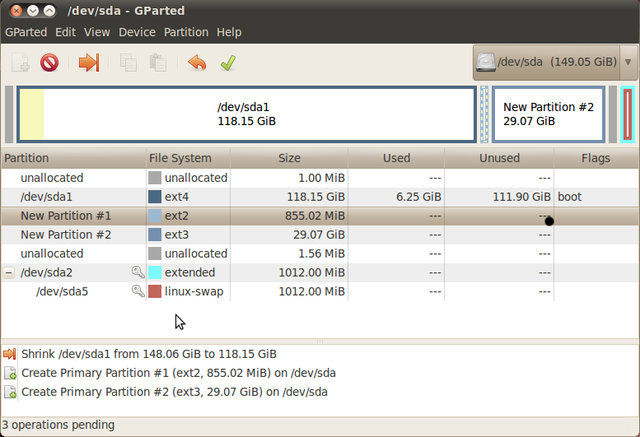
Click the Apply button on the toolbar to complete partitioning, and when you’re done, note down references of two new partitions, which will be something like /dev/sda3.
#2 Copy Chromium OS Files
Now, you need to open a Terminal window to copy the partitions from your USB dongle onto your hard drive, installing Chromium OS as a secondary operating system adjacent to the one you already have. Type in the Terminal:
sudo dd if=/dev/C-STATE_USB_PARTITION of=/dev/MACHINE_SMALL_PARTITION bs=4096
sudo dd if=/dev/C-ROOT_USB_PARTITION of=/dev/MACHINE_LARGE_PARTITION bs=4096
Where C-STATE_USB_PARTITION stands for the partition reference for your USB dongle’s C-STATE partition, MACHINE_SMALL_PARTITION is the corresponding partition on your netbook's drive. So, for example, your commands may look like this:
sudo dd if=/dev/sdb1 of=/dev/sda3 bs=4096
sudo dd if=/dev/sdb2 of=/dev/sda4 bs=4096
For more information on Chromium OS files copying, refer to Hexxeh’s guide on multi-boot.
#3 Installing/Updating GRUB Bootloader
You need to ensure you can boot into Chromium OS, so open Terminal from Ubuntu and run these commands:
sudo grub
> root (hd0,0)
> setup (hd0)
> exit
Next, run
Sudo update-grub2
The next time you boot, you must have the option to boot either to Chrome OS or Windows.
Final Words
Of course, it is more time-consuming than simply buying Chromebook, but you can simply resort to booting into Chrome from a USB dongle without actually installing it on your hardware. In addition, it is always cheaper and easier to be able to use your existing hardware without buying a new one. One way or another, chances are you might have to skip a couple of builds to find the one that works with your hardware, especially the Wi-Fi card. Once you give Chrome OS a try, make sure you let us know what you think in the comments below.