
How to Restore the Store App in Windows 10 After Removing it
Windows 10 comes with many preinstalled modern apps that some users prefer to remove in order to save disk space, if they don’t use them. If you read our guide for removing Windows 10 built-in apps, and you accidentally (or purposely) deleted the Store app but you can't bring it back now, then just follow the methods we describe in this article.
Since there are more than one ways you can remove the Store app, and since not all of them work the same way, not all methods will work. Therefore, you have to try each of the solutions until you find the one that works for you. The strategy you're meant to use is follow Method 1 first because it's the easiest, then follow Method 2 or Method 3 since it's guaranteed that one of them will bring back Store (although they're a bit more difficult).
Credit goes to the users of superuser for methods 2 & 3.
For easier navigation you can simply click on one of the links below to jump to a particular topic in the article:
Method 1: Register the Store App Again in PowerShell
Method 2: Copy and Register Missing Items from a Virtual Machine
Method 3: Reinstall All Default Apps (Including Store) Using Windows 10 ISO
Method 1 and Method 2 in this article require you at some point to open an Elevated PowerShell Window, so we’ll explain this procedure once, now:
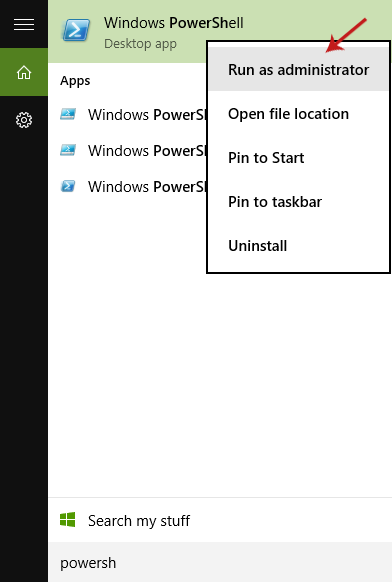
Opening an Elevated PowerShell Window
Open the Start menu and type “PowerShell” (without quotes). When the Windows PowerShell app is displayed in the results right-click on it and select “Run as administrator”, then press Enter to bring up PowerShell.
Method 1 - Register the Store App Again in PowerShell
This is the method you have to try first, since it's the easiest one. The success rate is not as high as in Method 2 and Method 3, but give it a shot anyways:
Step 1: Open Elevated PowerShell Window
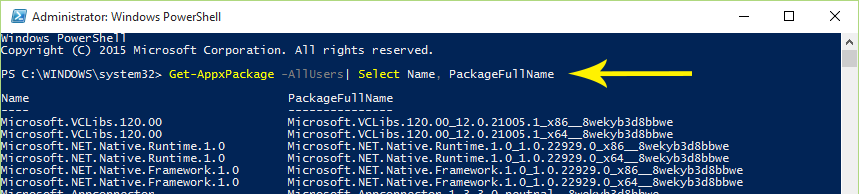
1. Open an Elevated PowerShell Window.
2. Type/paste the following command in PowerShell to view all available packages in the system:
Get-AppxPackage -AllUsers| Select Name, PackageFullName
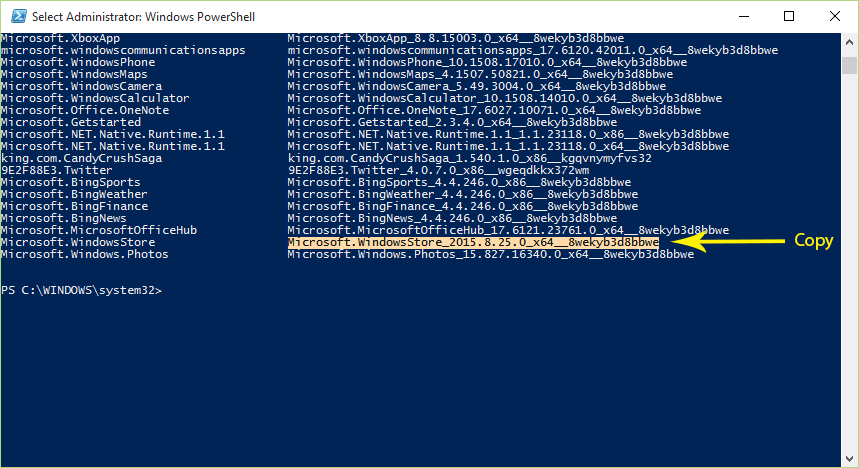
3. Now, locate Microsoft.WindowsStore in the Name column (left) and copy its corresponding full name from the PackageFullName column (right), which looks something like Microsoft.WindowsStore_2015.8.25.0_x64__8wekyb3d8bbwe.
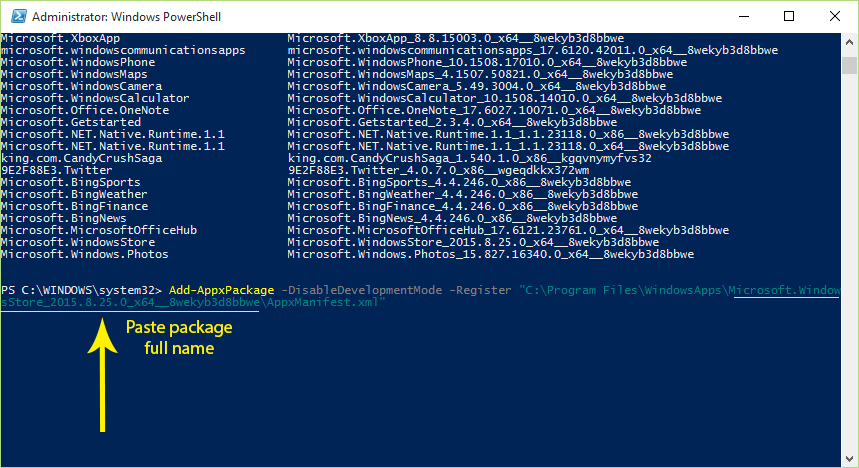
4. Type/paste the following command in PowerShell, replacing FULLNAME with the full name of the package that you just copied (assuming C is the drive in which Windows 10 is installed):
Add-AppxPackage -DisableDevelopmentMode -Register "C:\Program Files\WindowsApps\FULLNAME\AppxManifest.xml"
For example, in my case the command would be:
Add-AppxPackage -DisableDevelopmentMode -Register "C:\Program Files\WindowsApps\Microsoft.WindowsStore_2015.8.25.0_x64__8wekyb3d8bbwe\AppxManifest.xml"
If you have trouble accessing this folder (receive an “access denied” error), you may need to take ownership of the WindowsApps folder (C:\Program Files\WindowsApps) first.
Method 2 - Copy and Register Missing Items from a Virtual Machine
This method is for more difficult situations in which the above method didn’t work.
1. Download the Windows 10 ISO files.
2. Install Windows 10 on Oracle VirtualBox using the ISO you downloaded.
Note: The above two steps are required so that you can grab a copy of some folders (explained below) that do not exist in your machine, since they were deleted when you removed the Store app. Instead of running Windows 10 as a Virtual Machine, you can just get a copy of those folders from another Windows 10 machine that has the Store app (and other apps), if that’s easier for you.
3. Take Ownership of the WindowsApps folder (C:\Program Files\WindowsApps) in your own Windows 10 system (the one you’re trying to fix). If you don't see the WindowsApps folder, make sure that hidden files and folders are shown.
4. Check if the following 6 folders exist in the WindowsApps folder (their names might be slightly different that the ones presented here):
Microsoft.VCLibs.140.00_14.0.22810.0_x64__8wekyb3d8bbwe
Microsoft.VCLibs.140.00_14.0.22810.0_x86__8wekyb3d8bbwe
Microsoft.NET.Native.Runtime.1.0_1.0.22929.0_x64__8wekyb3d8bbwe
Microsoft.NET.Native.Runtime.1.0_1.0.22929.0_x86__8wekyb3d8bbwe
Microsoft.WindowsStore_2015.7.1.0_x64__8wekyb3d8bbwe
Microsoft.WindowsStore_2015.701.14.0_neutral_~_8wekyb3d8bbwe
5. Find which of the above 6 folders are missing, copy them from the same directory of the Windows 10 Virtual Machine you setup (or another Windows 10 system with its default apps untouched) and paste them to your WindowsApps folder.
6. Open an Elevated PowerShell Window.
7. Register the folders you placed in the WindowsApps folder by typing/pasting the following command in PowerShell:
foreach ($folder in get-childitem){Add-AppxPackage -DisableDevelopmentMode -Register "C:\Program Files\WindowsApps\$folder\AppxManifest.xml"}
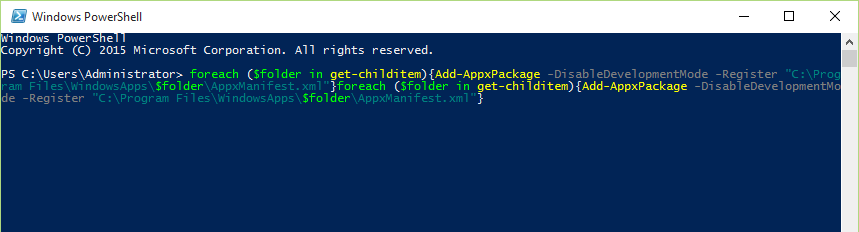
[Some of the folders might be already registered, so you might receive errors when they’re being processed. Don’t worry about this though.]
8. Check to see if Store has been reinstalled by opening the Start menu and typing “Store” (without quotes). If it appears on the results and you successfully open it, then the method worked and you’re good to go.
On the other hand, if it appears on the results and you open it but it closes almost immediately, then proceed to step 9.
Optional, If Store Opens and Closes Immediately:
9. You need to give permissions for the ALL APPLICATION PACKAGES account to the WindowsApps folder. To do that:
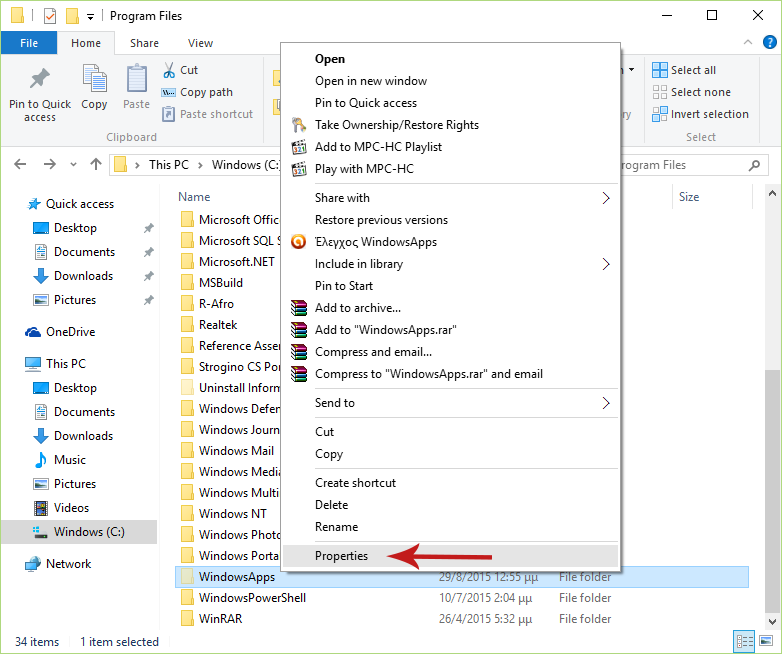
i) Make sure you have ownership of the WindowsApps folder.
ii) Right-click on the WindowsApps folder and select Properties.
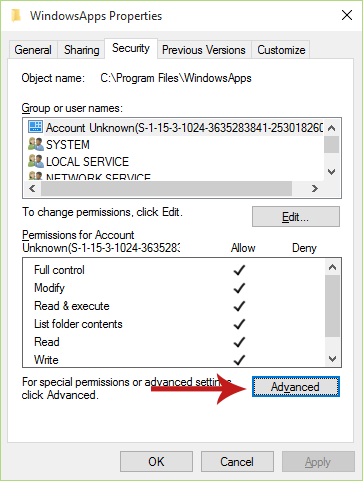
iii) Go to the Security tab and click Advanced.
iv) In the Advanced Security Settings, click the Add button.
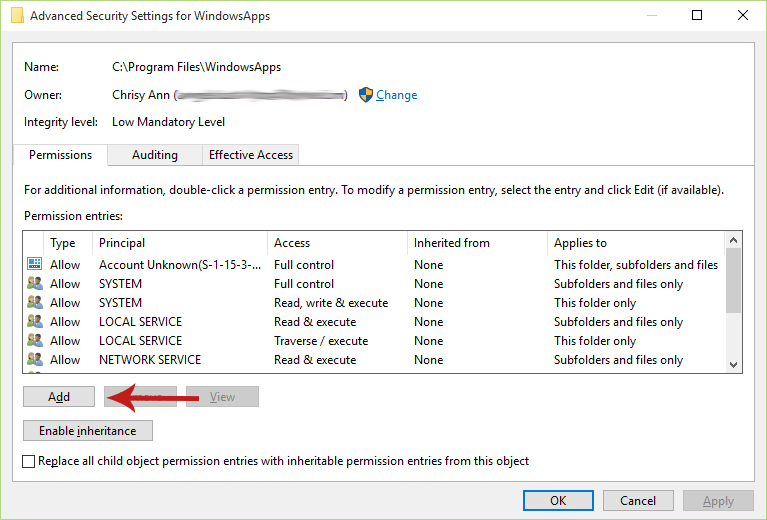
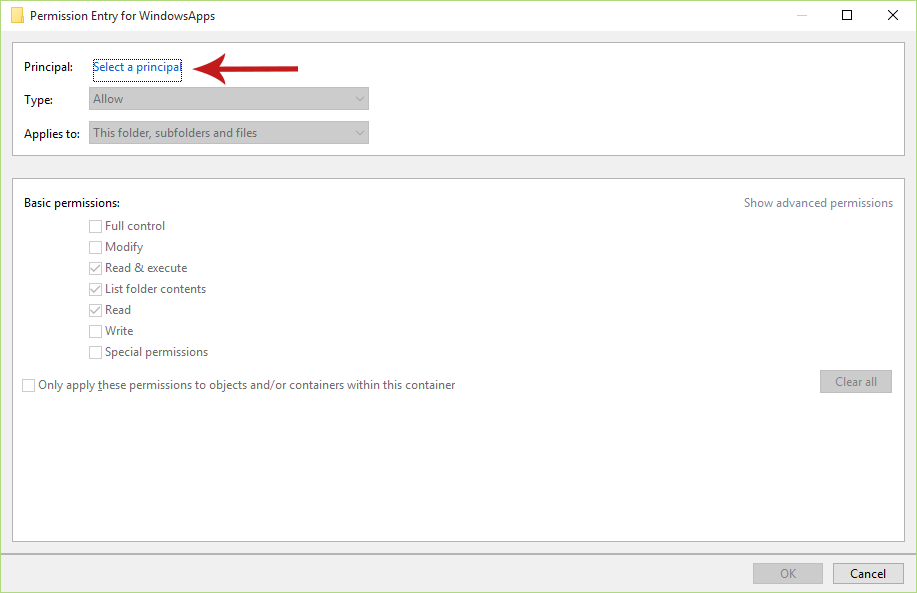
v) Click on the "Select a principal" link located at the top of the window.
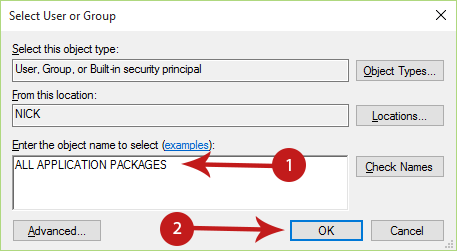
vi) Type "ALL APPLICATION PACKAGES" (without quotes) in the textbox of the new window and click OK.
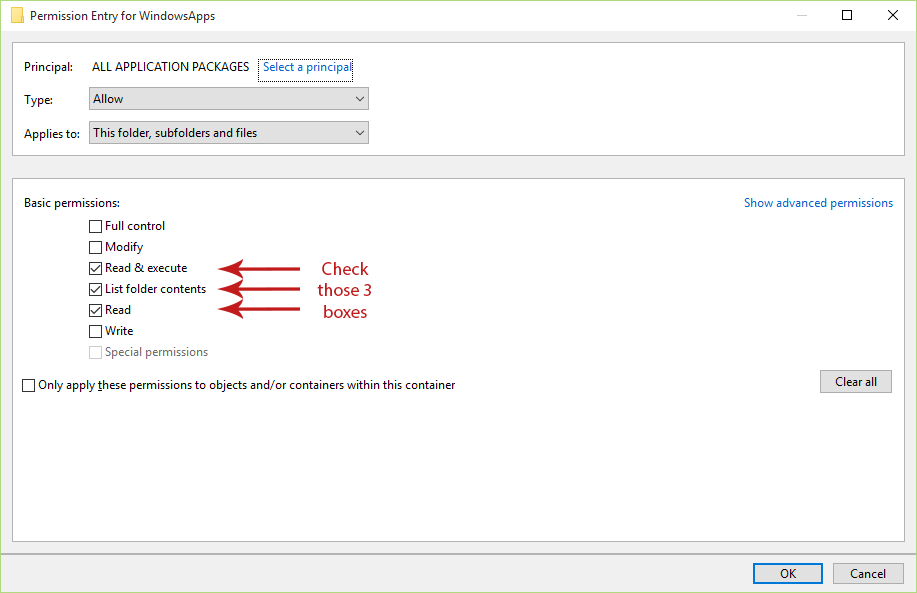
vii) Check the following permissions: Read, Read & execute and List folder contents. Then click OK and close all open windows.
Now try opening the Store app again. It’s fixed now, isn't it?
Method 3 - Reinstall All Default Apps (Including the Store App) Using Windows 10 ISO
In this method we’ll reinstall all the missing apps from the Windows 10 ISO file.
1. Download the Windows 10 ISO files.
2. Mount the ISO file you just downloaded, and run it.
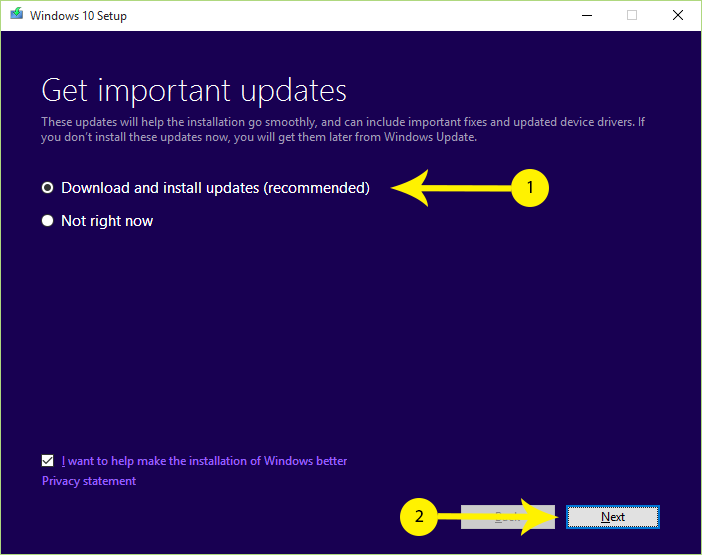
3. Select “Download and install updates (recommended)” in the screen that appears, then click Next.
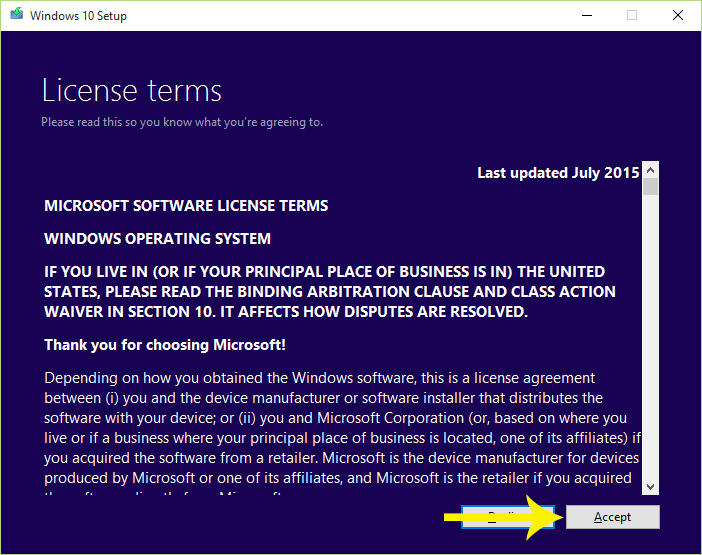
4. Select Agree to the License Terms.
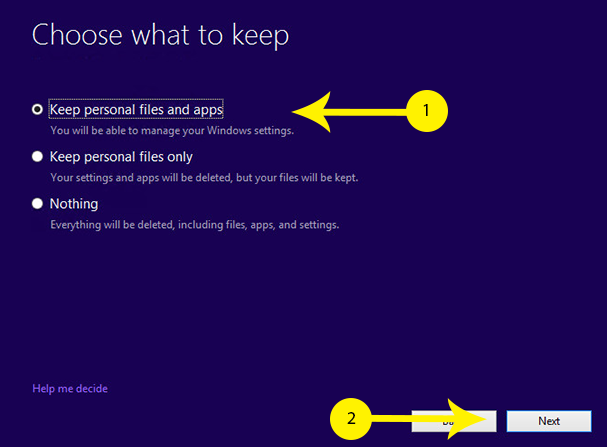
5. Choose “Keep Windows settings, personal files, and apps” and click Next.
6. Wait for the process to finish. When it’s done, you’ll have all the default apps back, including the Store app.
You can remove the ones you don’t want afterwards, but make sure you keep Store this time! Also, you might have to reinstall some updates again via the Windows Update, but that’s not a big deal.
Hopefully one of those methods worked for you, so everything is back in order! If you did something else and it worked, please share it with us! And if no solution brought the Store app back, then let us know and we’ll try to help you out!

There is a message at the bottom from the windows installation program that tells that it´s because the actual Windows version could be installed in an invalid directory.
Thank you
Any ideas?