
How to Remount Safely Removed USB Devices without Re-Plugging Them

So you have a USB dongle and you safely disabled it using the icon in your taskbar notifications area or via a Safely Remove Shortcut we showed you in another tutorial. You can no longer access the flash drive, and you can now safely remove the drive. Sometimes you would like to be able to re-enable the USB dongle without removing the stick from USB port and plugging it back again. In Windows, the USB dongle has to be enumerated, so that the system can detect the stick and load the driver to make it available again.
Even though Windows makes it very simple and straightforward ejecting your USB flash drives safely, there is no overly easy solution to remount the ejected drive without unplugging and re-plugging it again, which can be quite troublesome if a USB port is at the rear side of your machine.
Occasionally a USB device can lose connection to the computer. This occurs when the device itself loses power while the computer does not. For example, when the computer goes into standby, or to a power saving mode, it shuts down power to USB ports. In addition, it can happen when computer returns from hibernation mode. The problem is the computer no longer detects the device, and you will not be able to work with it.
The ability to remount ejected USB drives may be useful for admins working remotely and don't have physical access to the computer.
Surprisingly, Internet does not offer a lot of easy solutions, but here are some workarounds that may work for you. Using one of these methods will enable you to remount an ejected USB drive without re-plugging it into the USB port, but keep in mind that you must absolutely know what you're doing, especially if you go for the first option, and unless you feel you are technically savvy, you may be better off resorting to third-party software (second option), or unplugging and re-plugging the flash stick, to save yourself the hassle.
#1 Device Manager
The first and the most obvious option is remounting an already ejected USB drive manually via Device Manager. The only advantage of this method is it does not require any third-party software and relies solely on Windows Device Manager.
After you have ejected a USB dongle, the icon of the device displays a yellow exclamation mark in device manager stating “Windows cannot use this hardware device because it has been prepared for safe removal, but it has not been removed from the computer (code 47).”
Press Win+Pause to launch system properties dialog window or find it from the control panel.
Find the hardware tab and select device manager.[alternatively, you can type devmgmt.msc in command line]
Click universal serial bus controllers.
You will see several items listed as USB root hub. Provided you know to which of them your USB dongle is connected, right-click on it and select disable.
Next, right-click on the disabled item and click enable. Your USB flash drive is re-activated again.
Note: in Windows 8.1, you will need to click No when the system prompts you to restart it after enabling the device. Windows 8.1 remounts the USB drive after you repeat the procedure twice while Windows 7 does not seem to recognize the workaround.
#1.1 Automating the procedure with the help of DevCon
A command line utility, DevCon, can enable and disable a device through Device Manager. Once you unzip the utility, you will need to find the ID of your USB flash drive. You can do so by clicking on the USB mass storage device and then going to the Details tab. From there, go to Property drop-down menu and choose hardware IDs. Copy the value of your USB dongle into Notepad.
Next, copy into the notepad the following 4 lines, replacing “Your_PARTIAL_HW_ID” with your USB flash drive ID:
devcon disable *YOUR_PARTIAL_HW_ID*
devcon enable *YOUR_PARTIAL_HW_ID*
devcon disable *YOUR_PARTIAL_HW_ID*
devcon enable *YOUR_PARTIAL_HW_ID*
Next, save the file as disable-enable.bat and place it together with devcon.exe. The next time you want to remount ejected SB flash drive you need to run the batch file. Note, this only works in Windows 8.1.
#1.2 Windows 7 option – uninstalling USB Root Hub
Uninstalling and reinstalling USB Root Hub works to remount an ejected USB drive in Windows 7. After you have ejected USB drive, launch Device Manager pressing Win+Pause. It will Open System window where you can select Device Manager. Another option is to enter devmgmt.msc in command line.
Next, select View from the Menu and choose Devices by Connection.
Find USB mass storage device, the one with the yellow exclamation mark and right-click on its USB root hub. Choose uninstall from the drop-down menu.


Click the action menu and click on “scan for hardware changes.”
This effectively forces Windows reinstall USB devices under the Root Hub you have just uninstalled.
Please note, disabling USB mass storage device can result in disabling all USB connected devices, including ADSL modem connected to your USB port.
In this regard, devcon command is easier in a way that you don’t need to identify USB ID if you just use the command, but keep in mind this workaround does not fork on Win 7 64-bit systems:
devcon remove *root_hub20*
devcon rescan
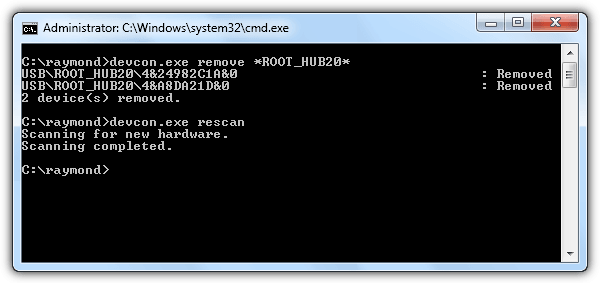
Image source:Raymond.cc
#2 Third-party software
My personal vote goes to this section – the following apps offer a simple and hassle-free way for common users.
DevEject for Win 7 [not Win 8.1]
DevEject is a rather simple tool you can configure to function as the “safely remove hardware” in Windows. With its help, you will be able not only to eject and unplug USB drives, but also detect files that impede the device from being ejected. The application supports configurable hotkeys.
In order to remount safely ejected USB drive, you have to choose the device from the DevEject interface and click Replug button.
This is another USB device manager capable of replacing the native Remove Hardware icon in Windows to stop, hide or rename a device, set up connect and disconnect, autorun, command line. It supports keyboard shortcuts, too. In addition, it can scan your device for errors stopping it from being ejected, and finally, it can remount a device that has been previously safely removed. In addition, it notifies if the procedure of re-enabling the USB drive may affect other devices.
Created by the developer of USB Safely Remove, Zentimo is even more powerful than its predecessor offering a quick launch menu, which allows you to disable Windows autorun, launch portable apps and test drive speeds. Besides, it offers a very convenient TrueCrypt integration.
Zentimo lists ejected devices as “ready for safe removal” and you can select “return device back” to re-enable the USB drive. The program supports Windows 7 and Windows 8, and even though there have not been updates for the past year, is still functional, and it is worth mentioning you can continue using it after the trial period is over.
Sources: Raymond, PCReview Forums, Digital NI.